Monday, December 10, 2012

Beach photoshoot with IFBB Bikini Pro Michele D'Angona


One of the benefits of getting into fashion and beauty photography is that you learn something new on every shoot. For example, I was not aware that there was such a thing as a Professional Bikini Bodybuilder until I had the opportunity to work with Michele D'Angona.

Canon 5D mkII 70-200mm 2.8L IS II iso200 1/1250 @ f4

Michele is a Body Transformation Specialist - a personal trainer/nutritionalist/competition coach who works with individuals to help transform them into their full athletic potential. You can learn more by visiting her website at  EmpoweringBody.com .

She has one of the most amazing physiques I have ever photographed - you could actually feel the air move when she flexes her muscles. ;-)


We did a morning beach shoot in Kaanapali. Michele came with her own personal makeup artist FouFou - a fantastic artist and so much fun to work with. You can check out more of her work here.


We started in the room with some headshots as FouFou finished working on Michele's makeup.  For these we set up a chair by the sliding glass door to the lanai which gave us lots of natural light to work with. I chose to use an 85mm f1.2 lens to help blur out the rest of the room behind Michele. Fou Fou added some motion to Michele's hair by using a small hair dryer.

Canon 5D mkII 85mm 1.2L II iso800 1/320 @ f3.2

Canon 5D mkII 85mm 1.2L II iso800 1/500 @ f2.8

Using the 85mm, it is still tricky for me to nail the focus when I have the lens wide open at f1.2, so I closed down to f2.8 and f3.2 do give me a little more space to work with.  Even then I still had to take a lot of shots before I got a usable image.  Practice, practice, practice.

Caught a rainbow right before we headed down to the beach.  Michele was willing to climb out to the adjoining rooftop to get some shots but being that we were several stories up, I didn't want to chance it. ;-)


This particular morning was mostly overcast, with occasional sunlight, so our images varied a lot.  When the sun popped out we would get some nice definition on Michele's physique and richer color in the sky.

Canon 5D mkII 70-200mm 2.8L IS II iso200 1/2500 @ f3.2


When the sun went behind the clouds, we got a much softer look.

 Canon 5D mkII 70-200mm 2.8L IS II iso200 1/1600 @ f2.8

 Canon 5D mkII 70-200mm 2.8L IS II iso200 1/1250 @ f3.2

Canon 5D mkII 70-200mm 2.8L IS II iso200 1/1600 @ f3.2

Lighting wise we stayed mostly with the silver California Sunbounce Pro to fill in shadows when it was sunny.  When it got cloudy, the silver Sunbounce was brought in closer to add a little bit of directionality to the light.  I did also bring along the AB800 and Vagabond, but for safety's sake decided not to use it since we were still getting the occasional drizzle.

Canon 5D mkII 70-200mm 2.8L IS II iso200 1/1600 @ f3.2

Canon 5D mkII 70-200mm 2.8L IS II iso200 1/1600 @ f2.8

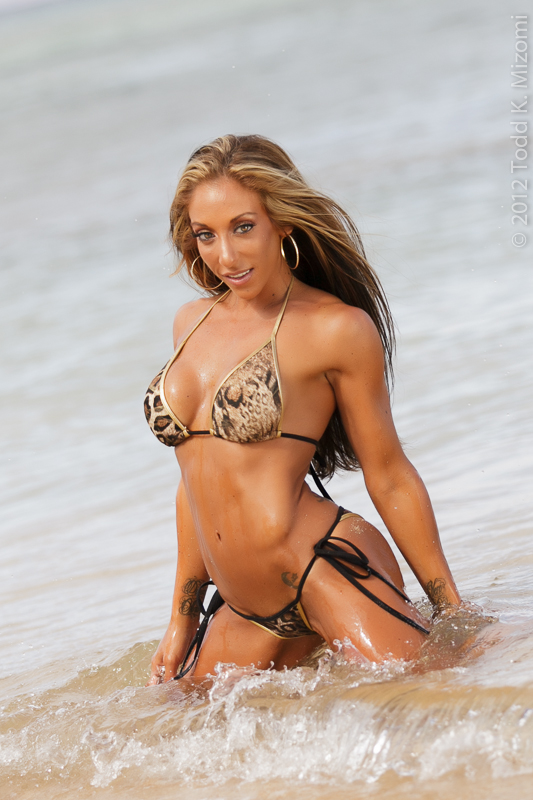
During one of the last shots we took with this outfit, the wind briefly picked up her hair and we got one of my favorite shots of the day.

Canon 5D mkII 70-200mm 2.8L IS II iso200 1/1600 @ f4

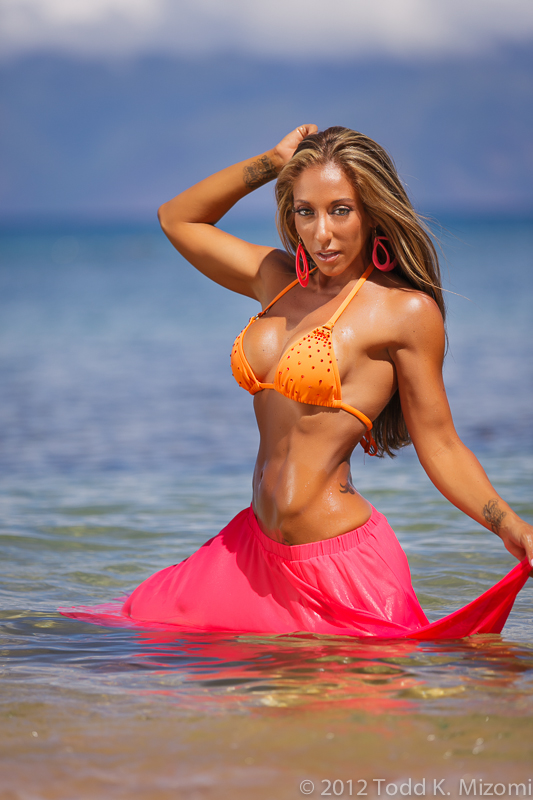
Michele changed into a different outfit and we did a few more shots, changing up the direction to try to get more blue sky to contrast with her pink wrap.

Canon 5D mkII 24-70mm 2.8L iso200 1/6400 @ f2.8

Even though the beach was relatively empty when we started shooting, I ended up having to Photoshop out a lot of people in the backgrounds.  For some strange reason when we started shooting, it started getting crowded only near our section of the beach. ;-)

Canon 5D mkII 70-200mm 2.8L IS II iso200 1/2500 @ f2.8

Once we finished our beach shots, we headed back into the garden area for a different look.
Tried a few shots near a tree, but decided to change up the location to something more 'jungle-ey"


We found this spot in the garden to shoot.  To get a slightly higher angle than Michele (one of the problems of being a short photographer - most models that I work with are taller than me), I stood on a nearby hill with FouFou standing next to me holding a smaller Sunbounce Mini to fill in the shadows.  By this time it was around noon and there was a lot of overhead sunlight streaming through the trees, so we had to position Michele very carefully to avoid hotspots appearing on her.

Canon 5D mkII 70-200mm 2.8L IS II iso200 1/200 @ f2.8

Canon 5D mkII 70-200mm 2.8L IS II iso200 1/250 @ f2.8


I really hope I'll have the chance to work with Michele and FouFou again as they were a lot of fun to shoot with. With such an amazing physique I think Michele would totally rock a Conan the Barbarian theme shoot.


Monday, December 3, 2012

Beach photoshoot with Dani


Canon 5D mkII 70-200 f2.8L IS II iso 400 1/200 @f16


A few months ago we did a sunset photoshoot down in south Maui with model/actress Dani Jae.  Dani was a lot of fun to work with and her wide range of expressions and movement gave us a nice variety of looks by the end of the evening.

The lighting was kept relatively simple for this shoot - we mainly used a silver California Sunbounce Pro to work with the existing light.  Later on for sunset we switched to a single AB800 with a 7" reflector powered by a Vagabond Mini Lithium Battery pack. Triggering was done via PocketWizard MiniTT1  with the AC3 ZoneController and PocketWizard FlexTT5 with the AC9 AlienBees Adapter.  This allowed us to remotely control the power level of the AB800 from the camera.

We started off with some basic headshots.  As we were walking down the pathway to the beach, Dani laughed as I suddenly stuck my head into the branches of some trees.  While I probably appeared slightly insane to her (and a lot of models that have worked with me probably think the same way), what I was looking for was a spot where I could use branches in the foreground of the shot and use the sun to backlight both the model and the branches in the foreground.


We positioned Dani in between the trees and had her escort Ryan bring the Sunbounce in close for her main light. I first tried shooting this with the 85mm f1.2, but it blurred out the branches a bit too much.  Switching to the 70-200 f2.8 helped define the foreground branches better.


Canon 5D mkII 70-200 f2.8L IS II iso 200 1/250 @f5.6


Canon 5D mkII 70-200 f2.8L IS II iso 200 1/250 @f5.6


I really liked how the sun lit up her hair from behind in combination with the quality of light that the Sunbounce produced and it was a bonus to have a great assistant like Ryan to help us out by holding the reflector in whichever position we needed it.


Canon 5D mkII 70-200 f2.8L IS II iso 200 1/160 @f7.1


We also tried a few shots on a nearby bunker.  As the sun got lower in the sky, it was getting obscured by the trees, so we had little pools of sunlight to work with.   By positioning Dani in certain spots, we were able to get sunlight to fall only on her hair.


Canon 5D mkII 85mm f1.2L  iso 200 1/400 @f2.8


Next Dani changed up her look and we shot against the side of the bunker.


Canon 5D mkII 85mm f1.2L  iso 200 1/160 @f2.8


Canon 5D mkII 85mm f1.2L  iso 200 1/125 @f2.8


We then headed down to the beach as it was getting close to sunset.  We did a few final shots with the Sunbounce before switching to the strobe. To get enough light on her, Ryan had to hold the reflector really close - just out of the left side of the frame in this shot.


Canon 5D mkII 70-200 f2.8L IS II iso 400 1/2500 @f2.8


Canon 5D mkII 70-200 f2.8L IS II iso 400 1/2500 @f2.8


While waiting for the sun to get lower, we tried a few jumping shots. The sun was still relatively bright so in order to stay within the camera's flash sync speed of 1/160, had to bring the iris down to f16 and power up the flash to full power.  Something I need to experiment with next time is using an ND filter so that I can shoot at a wider aperture.


Canon 5D mkII 24-70 f2.8L iso 400 1/160 @f16


As the sun got lower, the colors really started to pop.


Canon 5D mkII 70-200 f2.8L IS II iso 400 1/160 @f16 


Canon 5D mkII 70-200 f2.8L IS II iso 400 1/160 @f16


These last few on the beach I wanted to get more sky in the shot, but could not get low enough because of the way the  beach sloped down to the water.  Maybe next time I'll try digging a hole to jump into.


Canon 5D mkII 70-200 f2.8L IS II iso 400 1/160 @f8


Our last setup was at the showers near the beach park entrance.  Shooting flowing water using strobes is something that I've been wanting to do for a while, and this was a nice opportunity to try out some ideas.
The main light was a Canon 580EX II with a Gary Fong Lightsphere. We backlit the water with a Nikon SB26 and a blue gel.


Canon 5D mkII 70-200 f2.8L IS II iso 1600 1/60 @f5.6


Would have liked to experiment further with adding one or two additional lights, but it was getting late and our model was pretty soggy by then.  Didn't want to push it too far and have her possibly catch a cold. Always be mindful of what you are putting your model through during a shoot. You don't want to put her through hell.


Canon 5D mkII 24-70 f2.8L iso 200 1/200 @f2.8


Wednesday, November 21, 2012

Review - Gura Gear Bataflae 32L Camera Backpack


I usually use a roller bag to get my gear to location, but there are many locations here on Maui where it is not always feasible to do that.  For many years I had been using a traditional shoulder bag when I couldn't use my rolling camera case, but since that bag has finally started to give out, I started looking into camera backpacks.

The Gura Gear line of backpacks is advertised as being one of the lightest camera backpacks on the market.  It is constructed of the same sailcloth material that is used on racing boats.


I decided to go with the Gura Gear Bataflae 32L Camera Backpack.


It came packaged in a dust cover - a nice presentation, and I'm thinking that I could use the dust cover when I need to get down on the ground with my camera.


It has two main handles on the outside of the bag,


 plus a slim one on the bottom to help you get it into the overhead bin of an airplane.


There are M.O.L.L.E. attachments, a pocket, and a tripod strap on both sides of the bag.


The zipper pulls are color coded - the black ones open the outer pockets, the blue ones open the main compartment.


The two main outer pockets run the length of the bag and have various internal pockets for organizing things.


It also comes with a rain cover in a separate external pocket.


One of the main reasons why I chose this bag was because it was designed to open butterfly style, which keeps the flaps out of the mud/sand/dirt when the bag is on the ground.


The previous version of this bag, the Kiboko, only opened in this butterfly style.  With the Bataflae, there is a new feature that lets you open the entire backpack in the traditional manner which makes it easier to load the bag or work out of in an indoor environment. To do this you open the buckle on the top of the bag and unzip the blue zippers to the bottom of the bag. You then open the flap to get full access to the interior.


 The inside of the lid has velcro that runs the length of the bag - this attaches to the center divider when the bag is closed and allows it to open butterfly style.


The main divider that splits the compartment into two sections is removable, but if you want to maintain the sturdiness of the backpack it is probably not a good idea to take it out.


It also comes with a few extra dividers, but not as much of a variety as you get from other manufacturers.


You will notice that the velcro does not cover the entire surface of the dividers.   On the larger dividers, the velcro only covers the center portion.


The same is true for the interior of the bag - the velcro does not cover the corners.


On the floor of the bag, only the center portion is covered.


I'm guessing this was done to save weight, but this may limit some configurations you might want to do.  Personally I prefer to be able to put the dividers in any way I want, so I'm not too fond of this design choice.

The backpack straps are stored in a compartment in the back of the bag.


The backpack is very well padded and comfortable to wear. It will take you a minute or two to set up the straps after pulling them out of their compartment as there are several buckles that need to be connected first.


The upper part of the shoulder strap connects here


The bottom of the shoulder straps and the waist best buckles connect here.


The buckles that connect the bottom of the shoulder straps to the bag are of the 3-point variety instead of the usual 2.  So you have to press both sides of the buckle as well as the center button in order to get it to release.

That bit of extra security means that you cannot accidentally unhook the buckle and wind up having your backpack and your gear come crashing down.

Whenever you have an adjustable strap on a camera bag, there is always the problem of what to do with the excess length.  Gura Gear has come up with a really elegant solution to this.


There is a small velcro strap sewn into the end of the straps - you can simply roll up the excess strap and then velcro it together so that it doesn't keep flapping around.


A very smart idea which I wish more camera bag manufacturers would adopt.


Overall I like this backpack.  Because of the limited velcro on the dividers, I'll have to play around with the dividers to come up with a configuration that works for me. I'll be using this backpack for the next couple of beach weddings and see how it works out.