Wednesday, February 15, 2012

Tokyo studio shoot with Kayo

Canon 5D mkII 70-200mm f2.8L IS II lens iso 400 1/125 @ f5.6

This past December I was extremely fortunate to have the opportunity to work once again with one of my favorite models in Japan, Kayo Fantastic from Model Mayhem.

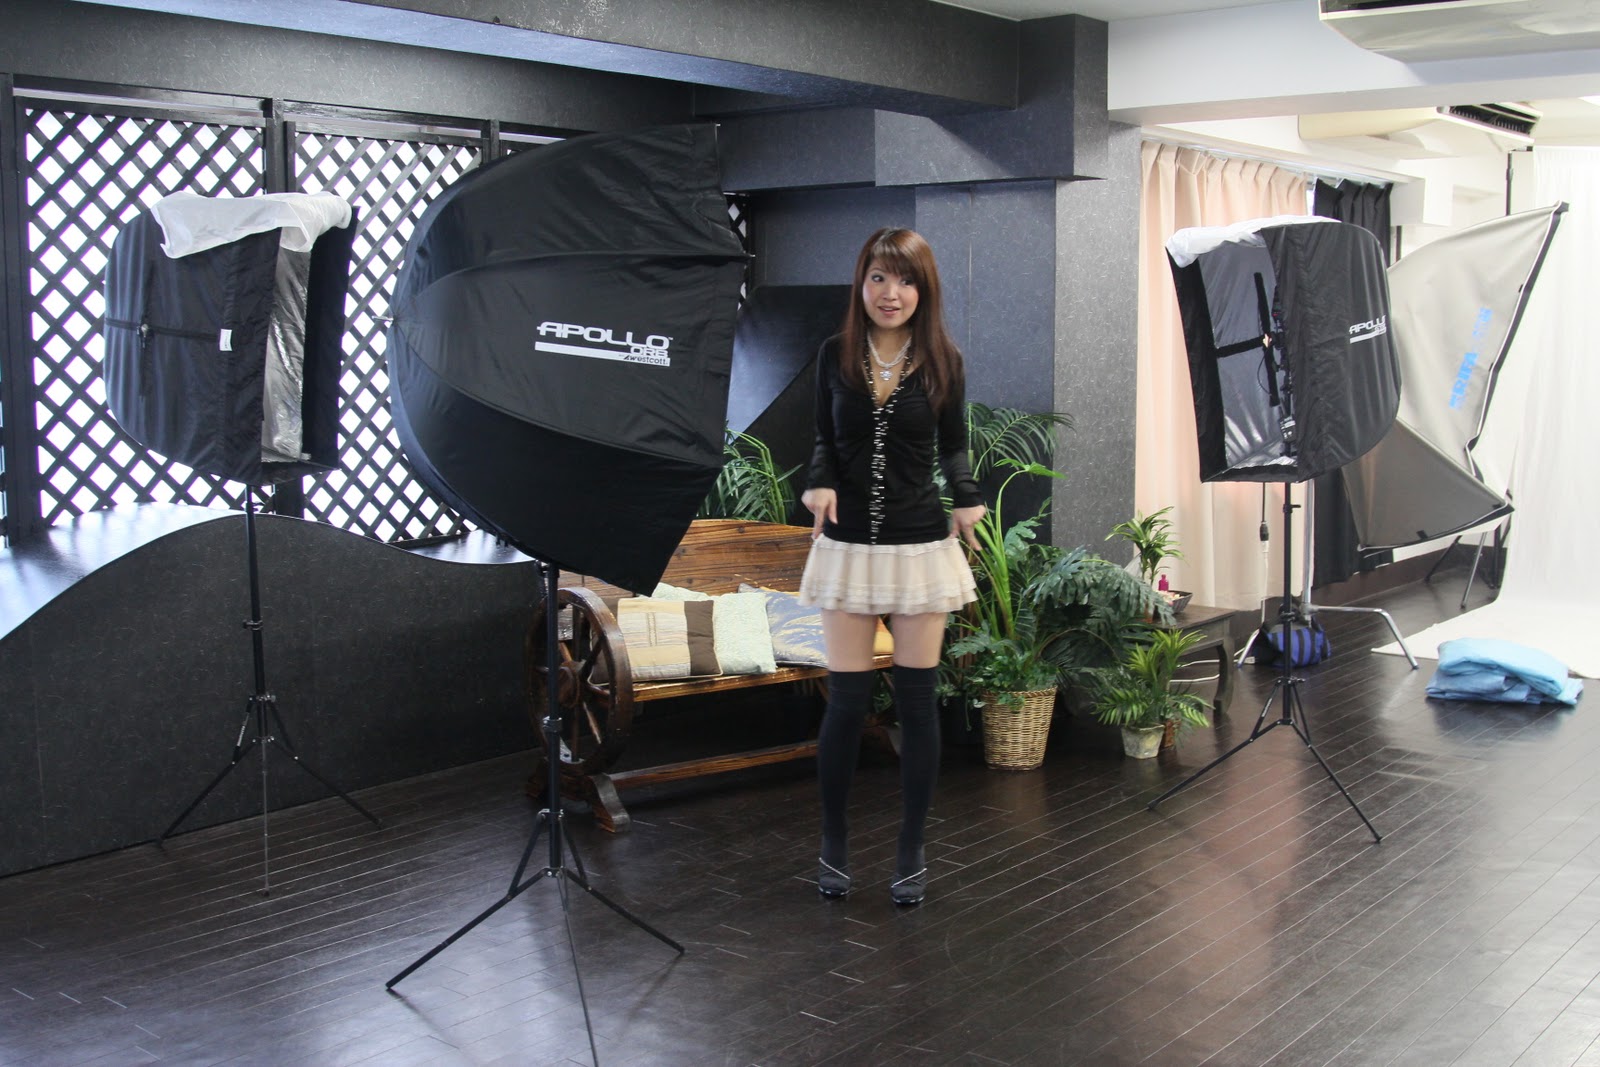
For this session we shot in the Force Studio in Edogawabashi.  This studio had a much darker theme compared to the previous studio we shot together in, which made it much easier to control the lighting. This worked out really well since we were going for a slightly edgier/sexier look for Kayo this time and I wanted to light her a little differently compared to our previous shoot together.

Our lighting for this session consisted mainly of 3 Nikon SB26 flashes triggered with Pocket Wizard Plus II tranceivers.  The light modifiers used were primarily the Westcott 43" Apollo Orb and two Westcott Apollo Strip Softboxes. We also used a Gary Fong Lightsphere and a  Lumiquest Softbox III for a few setups.


There were several potted plants near a bench in the middle of the studio and to keep things simple we used this as our first set.

An SB26 with a CTO gel and a Stofen Omnibounce was used behind the plants for a background light.


The Westcott Apollo Orb was used as the main light and the two Strip lights were used on either side of Kayo  to help separate her from the background.


Canon 5D mkII 70-200mm f2.8L IS II lens iso 400 1/160 @ f5.6

Canon 5D mkII 70-200mm f2.8L IS II lens iso 400 1/125 @ f5.6

Next we went into some headshots against a wall on the other side of the studio. Used the Westcott Orb as Kayo's main light, overpowering the existing window light.


An SB26 with a CTO gel and a grid was used to light the wall behind her.  Another SB26 was aimed at the back of her hair for a rim light.


Had a Vornado fan nearby to add movement to her hair.

Canon 5D mkII 70-200mm f2.8L IS II lens iso 400 1/160 @ f5.6

Canon 5D mkII 70-200mm f2.8L IS II lens iso 400 1/160 @ f5.6

Canon 5D mkII 70-200mm f2.8L IS II lens iso 400 1/160 @ f5.6

In one corner of the studio we found a set of prison bars.  This looked like it would be fun to work with but the space behind the bars was completely black. In order to give the shot some depth I knew we would need to light it somehow.


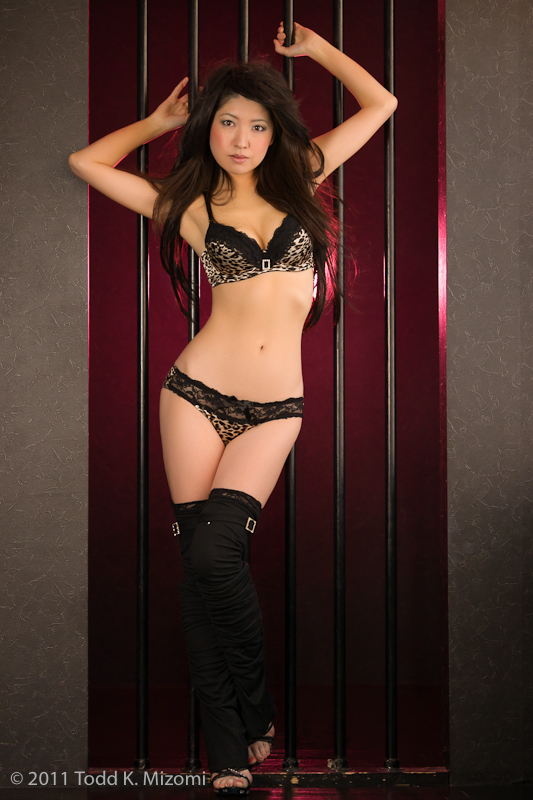
In the small corner behind the bars, we used a Nikon SB26 with a red gel and a Gary Fong lightsphere.  This lit both the background and rim lit the model in red.

Once Kayo had changed outfits, she found this great hairpiece to use which gave her a totally different look. We used one of the striplights for her main light, but positioned low in front of the bars and aimed up at her face to add a little more drama to the shot.

Canon 5D mkII 70-200mm f2.8L IS II lens iso 400 1/160 @ f4

After taking a couple of shots behind the bars, we then brought Kayo around to the front. There was a large window next to the bars which you can see in the photo below, and we did some natural light shots while still using the rear lights for background and rim light.


Canon 5D mkII 70-200mm f2.8L IS II lens iso 1600 1/125 @ f4 

Canon 5D mkII 70-200mm f2.8L IS II lens iso 1600 1/125 @ f4 

Since Kayo was now in front of the bars, the window light wrapped around her more, which greatly reduced the effect of her rim light.

Canon 5D mkII 70-200mm f2.8L IS II lens iso 1600 1/125 @ f4 

Canon 5D mkII 70-200mm f2.8L IS II lens iso 1600 1/125 @ f4 

To change up the lighting and go back to more of a glamour look, I added another SB26 to the lightstand behind the bars and aimed it towards Kayo.  I also swapped out the gel on the background light for one that was a little more red.


For her main light, we used another SB26 with a Lumiquest III Softbox.


Canon 5D mkII 70-200mm f2.8L IS II lens iso 400 1/125 @ f5.6

Canon 5D mkII 70-200mm f2.8L IS II lens iso 400 1/125 @ f5.6

While Kayo changed into her next look, I thought it would be nice to do a few more shots with the windows on this side of the studio since they had an interesting kind of high techy pattern on them.


A bare SB26 was set in the corner to act as a hair light.


Canon 5D mkII 70-200mm f2.8L IS II lens iso 800 1/160 @ f2.8 

We did a few shots with the window light as her main light, then switched to using the SB26 with a Lumiquest Softbox III.


Canon 5D mkII 70-200mm f2.8L IS II lens iso 800 1/160 @ f5.6

Canon 5D mkII 70-200mm f2.8L IS II lens iso 800 1/160 @ f5.6

Our final setup resulted in one of my favorite shots of the day and it worked out way better than I had originally planned.

This was a shot where we tried a combination of a fan and a length of red organza fabric wrapped around Kayo.  To be honest, I didn't really have a solid image in mind when we started working on this set (that's something I need to work on - getting a clearer idea of what I want to shoot BEFORE the shoot).  I only knew that I wanted to show fabric in motion, some mystery, and some sexiness without being too revealing.  I really have to thank Kayo for this one because she was extremely patient with me while I set everything up for this shot.

Although I had brought a small Vornado fan for the shoot, it wasn't really strong enough to keep the fabric flying upward out of the frame like I had originally planned. We had to figure out a way to suspend the fabric above Kayo.  Ideally in a situation like this we would use a stand with a boom arm or an assistant. Since we did not have a boom arm available (there's only so much lighting gear that I can bring when I travel), a bit of MacGyvering was needed.

Our solution was to use 2 ball bungies to strap a small light stand to the back of a chair to create an impromptu arm to which we could then clip the red fabric to:


Had to put some extra gear onto the chair itself to weigh it down so that it would not topple over onto Kayo.  Always think of your model's safety when suspending objects above him/her.

To light this we used two Westcott Apollo Strip Softboxes positioned on either side of Kayo.  In the setup shot, you can see all that stuff in the background.  By bringing in the lights very close to the model and setting the power levels to 1/2 power (or maybe it was full power?), we were able to overpower the existing light in the studio and hide all of that in darkness.


So now that we had that setup, I positioned the fan so that it would add a little motion to the part of the fabric that was suspended.  If we had been lucky enough to have had an assistant, we could have had them to point the fan at the fabric and move the fan from side to side until we got just the right look.  Since it was just Kayo and myself that day, I would take a couple shots, adjust the fan position, shoot a couple more frames, move the fan again, etc.

Like I've said before, assistants are invaluable on a shoot. :-)

Canon 5D mkII 70-200mm f2.8L IS II lens iso 100 1/160 @ f3.5

I also had Kayo shift her position slightly between shots so that we would get subtle differences in the feathering of the light across her form.

This shot was one of those where everything came together just right - the fan caught the fabric and made it ripple and Kayo's hand pose created some shadows that added a sense of mystery to the image that I really liked.

Canon 5D mkII 70-200mm f2.8L IS II lens iso 100 1/160 @ f4

It was so much fun to work with Kayo again, I just wish that we had more than just 3 short hours to work together this time as there was so much more we could have done together.  Will just have to save the ideas until next time.

Tuesday, February 7, 2012

Review - Shooting in the rain with the Think Tank Hydrophobia Flash 70-200

Since I do a lot of shooting outdoors, I recently ordered the Think Tank Hydrophobia Flash 70-200 raincover for my camera. In fact, I actually bought two of them.  One for my 5D mkII and one for my 7D.


I had the chance to actually use it under "combat conditions" this past weekend when it started pouring rain at a sunset wedding I was shooting on the beach.

We had just finished the ceremony and family photos when the sky just opened up and dumped on us. Everyone quickly ran under the nearest tree while we waited for it to [hopefully] pass.

There was another wedding couple that was shooting at the same time we were and their group decided to pack it up since the rain did not seem to want to let up.

In the meantime I got to my car, wiped down the cameras as best as I could and put the Hydrophobia raincovers on both my 5DmkII and 7D.  Within a few minutes I was ready to start shooting again in the rain.


The Hydrophobia has an internal strap that fits snugly around your lens and a strap on the outside that cinches around the lens hood.  Once you strap your camera in, you can carry the whole thing with the camera strap built in to the exterior of the raincover.  Since the existing camera strap on the camera itself does not have to be strung through the cover, it eliminates having to have 2 openings where rain can get into.  The camera is COMPLETELY covered except for the openings for the lens and for your hands to reach the controls.  You also don't need to take off your camera strap when using this raincover - there is an elastic loop on the inside of the Hydrophobia that you use to fold up and store your camera strap in.

When you order the Hydrophobia from Think Tank Photo, you also need to order an eyepiece specific to your camera.  [Check out the bottom of this post for a special limited offer that ThinkTank is offering] This replaces the regular eyepiece of your camera (and to keep you from losing that eyepiece, Think Tank thoughtfully designed an eyepiece storage pocket into the raincover).  The rubber gasket around the viewfinder portion of the Hydrophobia fits over this custom eyepiece and seals it from rain.  This way you are looking directly through an unobstructed viewfinder when you are shooting.

It's really well-constructed, with seam sealed zippers and heavy duty material. Once I got this on the camera, I was like "Rain? What rain? Let's go shoot!"

Couple of minor issues that I have:

1. The velcro strips around the eyepiece area could be smaller.  I also think they could get by with just two velcro strips instead of the 4 strips that it currently has. If they could redesign it so that you didn't need the strips on either side of the viewfinder, it would make it a little easier to read the LCD display on top of the camera.

2. The Hydrophobias are really designed for longer lenses like the 70-200.  I wish they would make a shorter version for like the 24-70 or 24-105.  While you can use the Hydrophobia raincovers with these shorter lenses, the extra material bunches up around the lens, making it somewhat difficult to adjust the zoom.

3. The plastic fogs up easily if you leave it in the car too long.  I kept mine in the car because I like to keep it handy as I never know when I'll need it, but found out that if I did so, the clear plastic portion of the raincover would fog up.  A lot.  Luckily, there is a very easy fix to that:


I emailed Think Tank Photo customer service about the fogging issue and they were very quick in getting back to me with a solution:

Hi Todd,


"It sounds like you have encountered an issue with the Polyurethane that is a bit unsightly but can be easily remedied.  We have decided to use PU as the clear material in our Hydrophobia rain covers because it has some superior characteristics over PVC (polyvinyl chloride).  PVC is the single most environmentally damaging of all plastics so we use PU partly because it is one of the most environmentally friendly plastics available at the moment.  In very cold weather PU will not crack or get stiff whereas PVC alternatives can crack or have other issues.  That all being said, sometimes the material can fog when stored wet or exposed to extended UV light.  To remedy the issue simply apply some gentle plastic polish such as "Flitz" or our preferred polish "Meguiar's PlastX."  Using a microfiber cloth so as not to scratch the material, apply a small amount of the polish and wipe away the fogging to restore the plastic to its original condition.

When not in use, keep the rain cover dry and not exposed to the sun.  To minimize fogging of the plastic windows, loosely store the rain cover, possibly hanging in a closet as the fogging generally occurs when it is folded snugly and packed away- especially after use in the rain."

That's one of the reasons I really like Think Tank Photo.  Not only do they make great gear, but their customer service is first rate.


Monday, February 6, 2012

Studio headshots with Brittney, Part II - Making backgrounds

Sometimes all you need to create an interesting backdrop is a flash and a pile of bones.

During Brittney's studio headshot session, we did a little experimenting with creating backgrounds on a plain white wall.


Since our lighting setup of a tabletopped softbox and the two gridded strip softboxes kept most of the light from hitting the back wall of the studio, the white wall was now a dark gray.


That meant that we could then take another flash and light the background in a different way from how we lit Brittney.  David Hobby of Strobist.com refers to this as "lighting on planes".

In the film/video world when you want to put a pattern on a background wall, you would use what is called a "cookie" - a metal disc with a design cut out of it.  This is put in front of a focusable light that projects the design onto the wall, creating a pattern.

We were all out of cookies that day so to improvise, we used a Nikon SB26 with a set of barn doors to control the spill of light. We set it up facing the back wall and tried putting different things in front of it to try and create an interesting pattern.  Tried a lot of things - garment bags, lace material, plastic cups, plants, nothing really seemed to click.

Until we found the remains of a skeleton lying around the studio.


Don't laugh, it actually worked out pretty well.  Skeletons should be a part of any well-equipped studio. ;-) 


We suspended the skeleton from a light stand and aimed the flash through the ribcage. We then just played around with the positioning of the flash and the skeleton until we got an interesting pattern on the background behind the model.


If we wanted to, we could also have added color to the background pattern by putting a colored gel over the flash.  Now that I think about it, we also could have tried putting larger sheets of gels onto the skeleton itself, maybe in multiple colors and see if that would have produced a multi-colored background when the flash fired through it.  Something to experiment with on a future shoot.

So the next time you're on a photoshoot and all you have is a blank wall behind your subject, try putting objects in front of your background light and see what happens.  You never know when you'll end up with something cool.

Friday, February 3, 2012

Studio headshots with Brittney, Part I

Recently did some headshots with model Brittney Baker in the studio, as part of a collaboration with makeup artist Kahulani and local artist Ben Kikuyama.

Wanted to try a different lighting style this time.  For our main light, an Alien Bee AB800 in a medium softbox, we boomed it up overhead and pointed straight down at the model (what's known as "tabletopping" the light).  Two AB800s in strip softboxes with grids on either side of Brittney were used to rim light her.


Since the main light was aimed straight down and the two strip softboxes had grids on them, we were able to keep most of the light away from the white walls of the studio, which made them go dark gray.


Canon 5D mkII 70-200mm f2.8L IS II lens iso100 1/160 @ f8

One of the things to be careful about when using the main light in this fashion is to make sure the model is not directly under the center of the softbox, but rather closer towards the rear edge.  This allows more of the light to wrap around the mask of the face.

Sorry for the crudeness of this drawing.  I'm not an artist. ;-)

While we were shooting we noticed that sometimes depending on Brittney's pose, the shadow under her nose would get really dark.  This is why having a very talented makeup artist on a photoshoot can really make a difference in the final images. As soon as we mentioned the shadow, Kat came up and adjusted Brittney's makeup. I don't know what she did exactly, or if she just waved a magic wand or something, all I know is that whatever she did worked.

Canon 5D mkII 70-200mm f2.8L IS II lens iso100 1/160 @ f8


Kat, you are just all kinds of awesome, you know that? :-)

For some of the later shots, we also added a silver California Sunbounce Micro Mini reflector just below the bottom of the frame to help soften the shadows a bit more.

Canon 5D mkII 70-200mm f2.8L IS II lens iso100 1/160 @ f8


Canon 5D mkII 70-200mm f2.8L IS II lens iso100 1/160 @ f8


Canon 5D mkII 70-200mm f2.8L IS II lens iso100 1/160 @ f8


For these last few sets Brittney wore her hair down, so we added some CTO gels to the two strip lights to help highlight her hair.  We didn't have enough gels to completely cover both strip lights, only about half of each, so the color difference is subdued a bit.

Canon 5D mkII 70-200mm f2.8L IS II lens iso100 1/160 @ f8


Canon 5D mkII 70-200mm f2.8L IS II lens iso100 1/160 @ f8


Canon 5D mkII 70-200mm f2.8L IS II lens iso100 1/160 @ f8


Canon 5D mkII 70-200mm f2.8L IS II lens iso100 1/160 @ f8

Part 2 of this post will illustrate how you can create interesting backgrounds using a flash and some not so ordinary household items.