Sunday, November 29, 2009

Kauai photoshoot with Rosanna

Did a shoot this weekend with model Rosanna Picardi, who contacted me through Model Mayhem.
Rosanna is an amazing model to work with. Very energetic, extremely professional, and jaw-droppingly beautiful in person.

I had originally planned to work with Rosanna on Maui the Sunday after Thanksgiving, but due to complications with flight arrangements, we were not able to get her over to Maui for a full day of shooting. Since she had a shoot planned on Saturday with photographer Chaz from After6Media, we all agreed it would be better to arrange a joint shoot on Kauai instead.

Because I had to fly over to Kauai to do this shoot, I was limited in the amount of gear I could bring. For lighting, I mainly relied on my California Sunbounce reflectors and some small strobes.

Canon 1d mkII 28-70mm L lens ISO 100 f20 @ 1/5 sec.

We first went to Kipu Falls. The water was pretty rough, and the original set of rocks I wanted to have her pose on proved to be too difficult to reach (I know because I got completely soaked trying to cross the stream to get to it). So we settled for some rocks that were closer to the side.
To get the above shot I mounted my camera on a tripod, added a neutral density filter to cut down the light, and used a silver California Sunbounce Pro reflector to light her. Played around with different slow shutter speeds to blur the water.


Canon 1d mkII 70-200mm L lens ISO 100 f11 @ 1/6 sec

Since it was not possible to get Rosanna directly under the falls, we had her pose at the edge of the top of the falls, to try to get as much of it in the background as possible. Rosanna is a really brave model because right behind where she sat was the sheer drop of the waterfall.

Because the sun kept going behind the clouds, we switched to using a silver California Sunbounce Micro Mini reflector and bounced an SB26 at full power into it. Chaz held the reflector/flash combo to camera left, just inches away from the edge of the cliff. Dangerous as heck, but hey, it made a great shot. ;-)

Canon 1d mkII 70-200mm L lens ISO 400 f5.6 @ 1/50 sec

After the waterfall, we went looking for some parks and botanical gardens. We passed by one area and noticed some old train cars. It turned out this place had an actual working railroad - the Kauai Plantation Railway. The staff there was very friendly and gave us permission to do a few shots there. This headshot was done using just natural light and nothing else. There was a white rain gutter in the background that I darkened in Photoshop to lessen the distraction in the image.

Canon 1d mkII 70-200mm L lens ISO 400 f5.6 @ 1/1600 sec

For this shot on the tracks, I walked around until I found a section of track that kind of S-curved. This was from a lesson I learned from photographer Rolando Gomez. I could have just shot her on a straight portion of the train track, but by working in this section, the curve of the tracks creates an interesting line that leads the eye to the model. To help blur the background, I zoomed out to 200mm and setup my camera far away from the model's position. Lighting was a silver California Sunbounce Mini held just out of frame to camera right.


Canon 1d mkII 24-70mm L lens ISO 100 f8 @ 1/250 sec

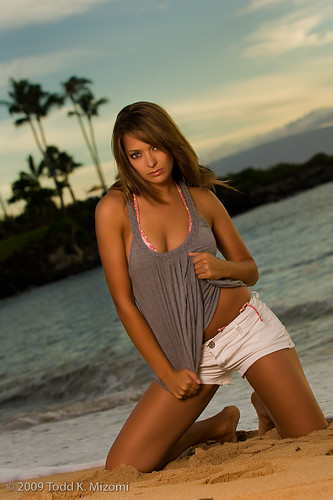
Later in the afternoon we found this small stretch of beach near a restaurant. Since time was limited (Chaz and I had to get back to the airport to make our return flights), we settled for this spot to do some sunset shots. Rosanna wanted to do some Bond Girl type shots, so we used a couple of Tomb Raider airsoft pistols as props. Being very pressed for time, lighting was done on camera with a Gary Fong Lightsphere diffuser aimed directly at the model.

I ended up boarding the plane that night covered in mud, sand and salt water (but with some great images). :-)

Wednesday, November 25, 2009

A photoshoot that I will always remember


Kapalua, originally uploaded by Mizomi Photography.


Whenever I plan to work with a new model, one of the first things I do is ask them if they have someone (friend/relative) that can come along with them as an escort. Some photographers don't like to have escorts at the shoot, but to me it's always nice to have them there to help the model feel comfortable and also assist with the shoot.

Back in September I did a photoshoot with Makenzie. When we started planning the shoot, she asked if her mom could accompany her on the shoot. Of course, I agreed.

On the day of the shoot, I found out from another photographer that Makenzie's mom was also recovering from a recent back surgery. So I decided to try as much as possible to not have her do anything too strenuous.

In spite of that, Makenzie's mom was a really big help on the shoot - holding reflectors and helping us move equipment from location to location. You could tell she really enjoyed watching her daughter's photoshoot, even encouraging her daughter to try some wacky shots as well.

When we wrapped up the shoot and got back to my car, I loaded the images into my MacBook Pro and had Makenzie and her mom look through the shots.

It was getting kinda dark and chilly in the parking lot but the two of them sat together for a long time, huddled over the laptop and choosing the ones they liked.

A few days ago I received this email from Makenzie:

Just checking in, and seeing how you were doing!

I'm definitely missing Maui, and i have a feeling i will be back with in the next year!


I just wanted to thank you again for the amazing shoot! Honestly that shoot means more to me than any shoot so far! I appreciate you taking the time to do the shoot and all you're work you put into it! but more than anything I want to thank you for letting my mom come along! 3 weeks after we got back from our trip my mom passed away! and that shoot is one of my favorite memories that I have because she got to come along and see the whole process, she was always my biggest fan and i know it truely made her happy and as it does me that she got to be there! I'm not trying to give you a sob story but mainly just tell you have much I appreciate all of the great photos I received from the shoot, the things i learned from working with you, and for being such an awesome and caring person and being flexible to having my mom come along! It really truely means alot!


Thanks again! and maybe hopefully next time im in Maui we can work together again


Hope things are going well in your neck of the woods or rainforest ;-)

Talk to you soon,

*Makenzie


Thursday, November 5, 2009

Photographic Therapy Book by Rolando Gomez


Photographer Rolando Gomez has a new book out called "Photographic Therapy - The Power of Photography to Help Build or Rebuild Self-Esteem". No matter what level of photographer you are, I think this should be required reading for anyone who photographs people.

Unlike his previous books which dealt more with posing, lighting, and techniques, "Photographic Therapy" focuses more on the interaction that goes on between the subject and the photographer before, during and after a photosession. While he does devote some chapters to posing and lighting, he mainly writes about how important it is to know and understand the person in front of the lens, whether it is a housewife, a Playboy model, or a corporate executive.

I think sometimes we forget about the power that a photograph has. Using the right combination of lighting, gear, & technique we can photograph someone and make them look like a cover model. We have the ability to make that same person look horrifying much less appealing just by using different lighting or lens or pose (or by generally screwing it up, as I have done countless times). We can be too caught up in trying to get that one perfect shot in our minds, that we don't stop to think about how the subject feels about the images we create, and how it affects their self-esteem.

In his book, Rolando draws from his many years of experience and explains how he interacts with his subjects and tries to understand their thoughts and feelings. He describes his techniques for adapting to each individual person that he photographs, such as what to say and what not to say. He also shows how he adjusts posing and lighting to make his subjects look their best.

Rolando mainly covers the HUMAN element of photography, the interpersonal communication between the subject and photographer. With the right attitude and skills, if you get it right, you can really help someone. That's one of the things I've come to really enjoy about photography - it's a skill you can use to make a difference in a person's life.

What I appreciate most about this book is that Rolando decided to release this book for FREE. It is available for download from freephotographybooks.com.

It's very rare that you will find photographers with his skills and experience that are willing to share their knowledge with others. It's rarer still to find one that is willing to do that for free. I strongly urge everyone to check out this book.

Tuesday, November 3, 2009

Lighting a kiln


Just a quickie post for today.

I was recently asked to shoot one of my high school classmates, the owner of Decorous Studio , for an upcoming magazine article about her. For this shot, I wanted to simulate the glow of the kiln without actually turning it on. (I was sweating enough as it was).

I put an SB26 with a red gel and a Stofen omnibounce into the kiln and triggered it with a Pocket Wizard. Had to carefully position it because the kiln is really tiny (smaller than a microwave oven) and the SB26/Pocket Wizard combo barely fit in there.

I had setup another SB26 bounced into the ceiling behind her to add fill, but decided not to use it, as the red glow as more effective without it. The fill light that is in the picture is coming from the doorway that I am standing in.

Friday, October 16, 2009

More from Saturday's photoshoot

Finally cleared up my video editing backlog and had more time to work on images from this past Saturday's photoshoot with wolfpup.


I put this image in my previous post, but wanted to play around a bit with the cropping in Lightroom. I kinda like this angle, as it fills the frame more with the model and gives it a little more drama. The only thing is that it cuts off more of the rock formation to the right. Haven't decided which one to use yet. Any suggestions?


Because I didn't have my Vagabond battery pack available, I wasn't able to use my studio strobes to overpower the sun like I had originally intended. I experimented in this shot using 2 SB26s on 1/2 power each. One is connected to a hotshoe adapter on the lightstand. The second one is ball-bungied right below it.


For this shot, I only had about 15 minutes to setup the set. This was a spur of the moment idea to try to recreate a bedroom set in the middle of a studio.

I covered a table with a white satin sheet and had the model climb onto that. I setup a c-stand next to the table and hung a couple of white drapes from the c-stand. Finally, in the background I put up a couple of folding wooden doors to simulate a closet.

For lighting I used an AB800 in a large softbox just out of the frame to camera right. I setup another AB800 barebulb behind the drapes - this was to simulate the sun coming in through the window.

After I took a test shot, I noticed the background was too dark, so I added another AB800 with a small softbox behind her. This lit up the background and also gave her an edge light.

I shot with a 70-200mm lens at about 135mm, wide open at f2.8. This blurs the background and helps hide the makeshift setup.

Sunday, October 11, 2009

Saturday Photoshoot at Dragon's Teeth

Shot this past Saturday with wolfpup, a Model Mayhem member I met through fellow photographer Allan of iCandy Maui.

I had originally intended to use a White Lightning 1600 strobe to try to overpower the sun, but unfortunately ran into some problems with my Vagabond battery pack while testing it the night before. This left me with using reflectors and my Nikon SB26s for lighting.

For the first setup at Dragon's Teeth in Kapalua, I had the model wrap some sheer fabric around her and try to get it flowing in the breeze. She had to struggle with the 10 yards of material (I bought too much of it), but managed to do it after several tries. It's harder than it looks, especially while trying to balance on sharp jagged rocks, and she really worked hard at it. I was really impressed with the results we got once we got it working.


For lighting, because I wasn't able to overpower the sun, I ended up using the sun as my main light and a California Sunbounce silver mini on a lightstand to fill. Didn't have any sandbags so I used a couple of big rocks to hold down the lightstand.

We then changed up the look a little. We wanted to see how the red kimono and sword would look against the sky.

The rock formations at Dragon's Teeth really lend themselves to cool shots. I think I might want to do a future shoot there with maybe a sci-fi theme.

We were a little pressed for time as I was booked for a wedding later that afternoon, so we headed to the studio in Kahului to try and do a few studio shots.

This was setup in the storage room adjacent to the studio. For her main light I setup an AB800 in a beauty dish in front. For the back light, I mounted an AB800 on a C-stand and boomed it above and behind her. To this light I added a 20 degree grid and a 1/2 CTO gel then carefully aimed it so that it hit the back of her hair.

Really wish we had more time to work together as we got some pretty good shots from this session.

Monday, September 14, 2009

Sunset Photoshoot with Makenzie


Did a sunset shoot with Makenzie from Model Mayhem this weekend at Kapalua Bay. Ran into a few snags with lighting, but we got some great results and an awesome sunset.

With a background in hip-hop/jazz dancing, Makenzie is a great model to work with. She also has these amazing green eyes so I wanted to start out with some headshots to capture that. We had her leaning in the shadow of a tree and positioned an SB26 flash to camera right. I zoomed the lens out to 200mm to blur as much of the background as I could.

Canon 1D MkII with 70-200mm L Lens 1/250 @ f5.6


We then moved to a hill overlooking the beach. Makenzie's mom held a Silver California Sunbounce Mini just out of camera right to bounce some fill light in. Shot it from a low angle to try to get below Makenzie's eye level and hide the snorkelers behind her. I cropped it to a 16x9 format to try to make her legs look longer and to hide the restaurant across the bay.

Canon 1D MkII with 70-200mm L Lens 1/250 @ f5.6


Next we went out onto the rocks near the water. At first I attempted something similar to my previous shoot with bodyfitt, using a slow shutter speed under natural light to blur the incoming waves, but it wasn't working too well. (Can't wait to get my carbon fiber tripod which will make it much easier to lug to location). So I went in another direction and setup the beauty dish with a CTO gel and the camera set to tungsten white balance to get this shot.

Canon 1D MkII with 28-70mm L Lens 1/250 @ f11

We moved to another section of the rocks and positioned her up high. I tried to get my lightstand into a position close to me, but the terrain made it difficult. I used an AB800 bare bulb to try to lighten the shadows .

Canon 1D MkII with 28-70mm L Lens 1/250 @ f8


Around the beginning of sunset, we headed down to the beach. By some stroke of luck, the beach was nearly deserted.

I setup a large softbox on my AB800 with a 1/4 CTO gel inside. I've always wanted to try this in the past, but usually run into problems with the wind so I had been sticking with the beauty dish for beach shoots. It was really calm today, so I was able to get the softbox up with no problem.

Unfortunately the battery pack for the strobe stopped working after a few shots. But I did manage to get a few good shots with it before it went out completely. It's a shame because I really liked the look we were getting with the softbox. This was one of my favorites:

Canon 1D MkII with 70-200mm L Lens 1/250 @ f8

With the sun setting quickly, I got out my 580EX and a Gary Fong lightsphere. [Thank you Chaz for reminding me to bring that ;-)]. Without it, I probably wouldn't have been able to get this shot:

Canon 1D MkII with 24-70mm L Lens 1/250 @ f2.8

Sometimes when the conditions are right, you get really cool colors in the sky if you wait around a bit after sunset. We lucked out that night and got an awesome firestorm in the background.
At this point it was so dark that I literally couldn't see her face. I had to rely only on the focusing aid from the 580EX to get the shot. The camera and flash setting were all manual, with the flash on 1/2 or full power by this time, using the Lightsphere with the white dome aimed directly at her.


Canon 1D MkII with 24-70mm L Lens 1/30 @ f4

Even with the few minor equipment mishaps we had, we got some pretty good shots out of this one. Now I just need to get all that sand out of my gear...