Showing posts with label Westcott Apollo Orb. Show all posts

Wednesday, February 15, 2012

Tokyo studio shoot with Kayo

Canon 5D mkII 70-200mm f2.8L IS II lens iso 400 1/125 @ f5.6

This past December I was extremely fortunate to have the opportunity to work once again with one of my favorite models in Japan, Kayo Fantastic from Model Mayhem.

For this session we shot in the Force Studio in Edogawabashi.  This studio had a much darker theme compared to the previous studio we shot together in, which made it much easier to control the lighting. This worked out really well since we were going for a slightly edgier/sexier look for Kayo this time and I wanted to light her a little differently compared to our previous shoot together.

Our lighting for this session consisted mainly of 3 Nikon SB26 flashes triggered with Pocket Wizard Plus II tranceivers.  The light modifiers used were primarily the Westcott 43" Apollo Orb and two Westcott Apollo Strip Softboxes. We also used a Gary Fong Lightsphere and a  Lumiquest Softbox III for a few setups.


There were several potted plants near a bench in the middle of the studio and to keep things simple we used this as our first set.

An SB26 with a CTO gel and a Stofen Omnibounce was used behind the plants for a background light.


The Westcott Apollo Orb was used as the main light and the two Strip lights were used on either side of Kayo  to help separate her from the background.


Canon 5D mkII 70-200mm f2.8L IS II lens iso 400 1/160 @ f5.6

Canon 5D mkII 70-200mm f2.8L IS II lens iso 400 1/125 @ f5.6

Next we went into some headshots against a wall on the other side of the studio. Used the Westcott Orb as Kayo's main light, overpowering the existing window light.


An SB26 with a CTO gel and a grid was used to light the wall behind her.  Another SB26 was aimed at the back of her hair for a rim light.


Had a Vornado fan nearby to add movement to her hair.

Canon 5D mkII 70-200mm f2.8L IS II lens iso 400 1/160 @ f5.6

Canon 5D mkII 70-200mm f2.8L IS II lens iso 400 1/160 @ f5.6

Canon 5D mkII 70-200mm f2.8L IS II lens iso 400 1/160 @ f5.6

In one corner of the studio we found a set of prison bars.  This looked like it would be fun to work with but the space behind the bars was completely black. In order to give the shot some depth I knew we would need to light it somehow.


In the small corner behind the bars, we used a Nikon SB26 with a red gel and a Gary Fong lightsphere.  This lit both the background and rim lit the model in red.

Once Kayo had changed outfits, she found this great hairpiece to use which gave her a totally different look. We used one of the striplights for her main light, but positioned low in front of the bars and aimed up at her face to add a little more drama to the shot.

Canon 5D mkII 70-200mm f2.8L IS II lens iso 400 1/160 @ f4

After taking a couple of shots behind the bars, we then brought Kayo around to the front. There was a large window next to the bars which you can see in the photo below, and we did some natural light shots while still using the rear lights for background and rim light.


Canon 5D mkII 70-200mm f2.8L IS II lens iso 1600 1/125 @ f4 

Canon 5D mkII 70-200mm f2.8L IS II lens iso 1600 1/125 @ f4 

Since Kayo was now in front of the bars, the window light wrapped around her more, which greatly reduced the effect of her rim light.

Canon 5D mkII 70-200mm f2.8L IS II lens iso 1600 1/125 @ f4 

Canon 5D mkII 70-200mm f2.8L IS II lens iso 1600 1/125 @ f4 

To change up the lighting and go back to more of a glamour look, I added another SB26 to the lightstand behind the bars and aimed it towards Kayo.  I also swapped out the gel on the background light for one that was a little more red.


For her main light, we used another SB26 with a Lumiquest III Softbox.


Canon 5D mkII 70-200mm f2.8L IS II lens iso 400 1/125 @ f5.6

Canon 5D mkII 70-200mm f2.8L IS II lens iso 400 1/125 @ f5.6

While Kayo changed into her next look, I thought it would be nice to do a few more shots with the windows on this side of the studio since they had an interesting kind of high techy pattern on them.


A bare SB26 was set in the corner to act as a hair light.


Canon 5D mkII 70-200mm f2.8L IS II lens iso 800 1/160 @ f2.8 

We did a few shots with the window light as her main light, then switched to using the SB26 with a Lumiquest Softbox III.


Canon 5D mkII 70-200mm f2.8L IS II lens iso 800 1/160 @ f5.6

Canon 5D mkII 70-200mm f2.8L IS II lens iso 800 1/160 @ f5.6

Our final setup resulted in one of my favorite shots of the day and it worked out way better than I had originally planned.

This was a shot where we tried a combination of a fan and a length of red organza fabric wrapped around Kayo.  To be honest, I didn't really have a solid image in mind when we started working on this set (that's something I need to work on - getting a clearer idea of what I want to shoot BEFORE the shoot).  I only knew that I wanted to show fabric in motion, some mystery, and some sexiness without being too revealing.  I really have to thank Kayo for this one because she was extremely patient with me while I set everything up for this shot.

Although I had brought a small Vornado fan for the shoot, it wasn't really strong enough to keep the fabric flying upward out of the frame like I had originally planned. We had to figure out a way to suspend the fabric above Kayo.  Ideally in a situation like this we would use a stand with a boom arm or an assistant. Since we did not have a boom arm available (there's only so much lighting gear that I can bring when I travel), a bit of MacGyvering was needed.

Our solution was to use 2 ball bungies to strap a small light stand to the back of a chair to create an impromptu arm to which we could then clip the red fabric to:


Had to put some extra gear onto the chair itself to weigh it down so that it would not topple over onto Kayo.  Always think of your model's safety when suspending objects above him/her.

To light this we used two Westcott Apollo Strip Softboxes positioned on either side of Kayo.  In the setup shot, you can see all that stuff in the background.  By bringing in the lights very close to the model and setting the power levels to 1/2 power (or maybe it was full power?), we were able to overpower the existing light in the studio and hide all of that in darkness.


So now that we had that setup, I positioned the fan so that it would add a little motion to the part of the fabric that was suspended.  If we had been lucky enough to have had an assistant, we could have had them to point the fan at the fabric and move the fan from side to side until we got just the right look.  Since it was just Kayo and myself that day, I would take a couple shots, adjust the fan position, shoot a couple more frames, move the fan again, etc.

Like I've said before, assistants are invaluable on a shoot. :-)

Canon 5D mkII 70-200mm f2.8L IS II lens iso 100 1/160 @ f3.5

I also had Kayo shift her position slightly between shots so that we would get subtle differences in the feathering of the light across her form.

This shot was one of those where everything came together just right - the fan caught the fabric and made it ripple and Kayo's hand pose created some shadows that added a sense of mystery to the image that I really liked.

Canon 5D mkII 70-200mm f2.8L IS II lens iso 100 1/160 @ f4

It was so much fun to work with Kayo again, I just wish that we had more than just 3 short hours to work together this time as there was so much more we could have done together.  Will just have to save the ideas until next time.

Friday, January 27, 2012

Travelling with the Westcott Apollo Orb and Strip Softboxes

The studios in Japan that I've used in the past usually already have lighting equipment available for use.   However, they tend to be constant lighting sources - tungsten or fluorescent lights. These are fine for general portrait lighting, but aren't very flexible if you want to do things like stopping motion or overpowering daylight.

When I travel, I normally take a bunch of Nikon SB26 flashes with me along with a couple of Westcott double fold shoot thru umbrellas and occasionally the Lastolite Ezybox Hotshoe Softbox. For this past trip however, I had several shoots where I needed light modifiers that could give me more control than the umbrellas. That's why I picked up the Westcott 43" Apollo Orb and two Westcott Apollo Strip 16"x30" Softboxes just before I flew up to Japan this past December.


I really liked the Apollo Orb.  Setup was really quick - it opens up and mounts on the lightstand just like an umbrella.  The diffusion panel can be recessed a little from the edge of the softbox, which gives you a little more control over the light.  Not as much control as a grid, but good enough for what I was doing.

It turned that small SB26 into a huge 43" octagonal light source that looked great on the model.


The Striplights were really helpful in controlling the light in situations where I really needed to keep the light off of the background.  In the following image, the two Striplights are positioned just out of the frame on either side of the model. If I had only brought the shoot thru umbrellas with me, it would have been extremely difficult to get a shot like this.


Although the Westcott Apollo Orb and the Striplights fold up like umbrellas, they don't fold up as short  as the double-fold shoot thru umbrellas do.  For my trip to Japan, it was challenging to find luggage that these softboxes would fit into. I did manage to find a rolling duffle bag at Macy's that worked though - a High Sierra Rolling Drop Bottom Duffle 34" Evolution for about $150.


This bag was perfect - in the bottom section I was able to fit the Apollo Orb, 2 Apollo Striplights, a California Sunbounce Micro Mini reflector + Grip Head, 2 Justin Clamps, an empty sandbag, a Speedlight Prokit Beauty Dish and 3 Manfrotto Nano Lightstands and still had room left over.


The bottom part of the upper section unzips if you need to pack larger items.


I used this rolling duffle to get the lighting gear to Japan.  Then when I went on location, the compactness of the Westcott softboxes made it easy to put them into the front exterior pocket of my Thinktank Airport Security 2.0 rolling camera bag along with a couple of lightstands. When you are a photographer traveling on trains and buses in Tokyo, it really helps if you don't have to carry a lot of bags with you.

The only real downside to using the Westcotts is that  because they mount onto lightstands like an umbrella, the flash ends up inside the softbox rather than on the back.

(in case you are wondering, the red coloring inside of the Orb in this shot is just the silver interior reflecting the backdrop we used)


To make adjustments to the flash power, you need to open up and reach into the softbox to do it, which is pretty easy to do, just don't attach the velcro on the bottom of the diffuser panel so that you can flip it up out of the way quickly.  Alternatively you can use something like the Pocket Wizard Flex TT1/TT5 and AC3 Zone Controller to adjust the flash power remotely.

Overall though, the ease of setup and control of light the Westcott Apollo series of softboxes along with the fact that I can now carry essentially an entire studio on my rolling camera bag make me really glad that I added these to my travel lighting toolkit.


Thursday, January 19, 2012

International studio shoot with Irish

Canon 5D mkII  70-200m f2.8L IS II lens iso 100 1/160 @ f5.6

While in Tokyo this past Decemver, I had the opportunity to collaborate with a truly international team - model Irish Kashima from the Philippines, makeup artist Mai Shimura from Japan, and body painter Yilei Liu from Shanghai.


Mai was able to book us some time at the Zero Studio in Edogawabashi. This was my first time in this studio and I tried to plan out the lighting in a way that we could move quickly between setups and make the most of our time there.

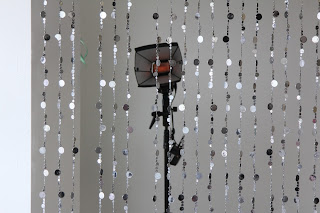
Our first setup utilized an existing curtain of shiny material in the studio that was hung next to some windows.  Since there was a lot of natural light streaming in from the window,  I decided to start with a strobe setup to first overpower the ambient light, then quickly switch to a natural light setting so that we could get two different looks in one setting.

For this first setup, a Nikon SB26 with a CTO gel and a Pocket Wizard Plus II tranceiver was set up behind the curtain.  A ProKit Speedlight reflector was used to direct the light onto her hair.


The main light was a Nikon SB26 with a CTO gel and a ProKit Beauty Dish positioned to camera right. We also used a small Vornado fan to add a little lift to the model's hair.


I set the camera to Tungsten white balance and did a series of headshots.  Also added a fan to give a little lift to her hair.  In addition, Yilei held a silver California Sunbounce Micro Mini to bounce some of the main light back as fill.

Canon 5D mkII  70-200m f2.8L IS II lens iso 200 1/160 @ f4

We started adding some accessories to Irish, and since we needed Yilei to help with other things, he wasn't able to hold the reflector anymore.  I setup another SB26 on low power right next to my camera to use as a fill light instead of relying on the reflector.


The reason that I used the CTO gels and tungsten white balance for this first set was so that the incoming window light would [hopefully] turn the background blue.  You can kind of see it in the reflective surfaces of the curtain behind Irish in the above headshot.  It didn't translate so well tothe back wall however, so I added another SB26 behind Irish and put a blue gel/Stofen Omnibounce on it to color the wall behind her.

 Canon 5D mkII  70-200m f2.8L IS II lens iso 100 1/160 @ f5.6


Canon 5D mkII  70-200m f2.8L IS II lens iso 100 1/160 @ f5.6


To quickly transition into our natural light look, the Pocket Wizards were turned off so that the strobes would not fire.  The camera white balance was set to cloudy white balance/aperture priority mode.

Canon 5D mkII  70-200m f2.8L IS II lens iso 400 1/125 @ f2.8

Canon 5D mkII  70-200m f2.8L IS II lens iso 400 1/80 @ f2.8

Moving to our second setup, we hung a red satin bedsheet on a backdrop stand.


You can find satin sheet sets like this at Ross's Dress for Less for around $25.  Didn't have a fabric steamer available so to help hide some of the wrinkles in the sheet, we put a fan behind it to add some movement to the fabric.


While we were testing, the Vornado turned out to be a little stronger than the white standing fan, so we swapped them around and used the Vornado in the back, with Yilei holding it and moving it from side to side to keep the bedsheet constantly in motion.

Mai adjusted Irish's lipstick to match the color of the sheet and we started shooting this look.
For lighting we used just one SB26 in a Westcott Apollo Orb Softbox to camera left.


Canon 5D mkII  70-200m f2.8L IS II lens iso 100 1/160 @ f2.8


We tried several variations on this, including wrapping one of the bedsheets around Irish as sort of an impromptu evening gown.

Canon 5D mkII  70-200m f2.8L IS II lens iso 100 1/160 @ f2.8

Canon 5D mkII  70-200m f2.8L IS II lens iso 100 1/160 @ f2.8

Found a blue muslin backdrop in the studio and wanted to try something different instead of simply hanging it.  I laid it out on the floor next to a ledge where I could get on top of for an elevated shot. We didn't have a ladder and the ceilings were pretty low, so I switched out the lens for the 24-105mm f4L IS so that we could get some full length shots.


We used some blue and pink organza fabric that I had brought and Mai wrapped them around our model.

Canon 5D mkII  24-105mm f4L IS lens iso 200 1/160 @ f4

Tried out one of the Dave Hill B/W presets in Lightroom and I kinda like what it did.  Always fun to experiment with new things.

Canon 5D mkII  24-105mm f4L IS lens iso 200 1/160 @ f4

While we were shooting these, Yilei did some sketching on a whiteboard and suggested the idea of making Irish into a mermaid using some red organza fabric.


This is why it's great to work with a team.  A lot of times ideas will come up during a shoot that you never even thought of.


We used the Westcott Orb Softbox again as our main light, and propped the Sunbounce against the ledge I was standing on to add some fill.


Canon 5D mkII  24-105mm f4L IS lens iso 800 1/160 @ f4

It took a while to get the pose and the fabric to look right.  I tried to emulate a water look in post, since we probably would not have been allowed to flood the studio floor with water.
Canon 5D mkII  24-105mm f4L IS lens iso 800 1/160 @ f4

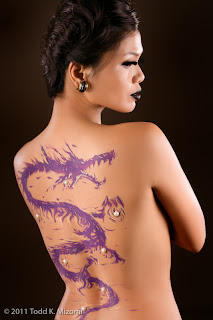
For our last look, Mai and Yilei wanted to experiment with body paint.  The idea was to paint a dragon onto Irish's back, then drip some gold paint over it.  It was something new and interesting to try, as I had never done a bodypaint shoot yet.


To light this, I wanted to put Irish up against a black backdrop, which we did not have.  Since the studio walls were all painted white, I knew we had to really overpower the ambient light with flash in order to make the background as dark as possible.


We setup as far away from the back wall as we possibly could.  2 SB26s in Westcott Apollo Strip Softboxes were setup to light Irish from either side.  The flashes on either 1/2 or full power and positioned really close to the model, just out of frame.  This made the white wall in the background go down to a very dark grey, which we could then tweak a little darker in post.

Canon 5D mkII  70-200mm f2.8L IS II lens iso 100 1/160 @ f5.6

Canon 5D mkII  70-200mm f2.8L IS II lens iso 100 1/160 @ f5.6

For the last few shots, Mai and Yilei added some gold paint dripping down the dragon.  The side-lighting helped bring out the texture of the paint.


Canon 5D mkII  70-200mm f2.8L IS II lens iso 100 1/160 @ f5.6


Canon 5D mkII  70-200mm f2.8L IS II lens iso 100 1/160 @ f6.3

Wish I could have made it look more sparkly (there were tiny flecks of gold in the paint that they used). Guess I'll need to study up more on how to light bodypainted models...

Made a short video of the shoot with lighting info and diagrams: