Tuesday, July 10, 2018

Gear Review - Think Tank Photo Camera Clip Adapter 3.0

Think Tank Photo recently refreshed their popular modular component system and sent us a couple of items for review.  Since wedding season has just gotten underway, we had the chance to take these out into the field to see how they compare to previous versions.

This is the Camera Clip Adapter v3.0 which is a padded support to be used with either the Peak Design Capture Camera Clip or the SpiderPro/SpiderLight Camera Holster system.


Both Peak Design and Spider holster make their own versions of padded supports for their systems and I've used all of them.


Here's the Think Tank Camera Clip Adapter V3.0 compared to the Peak Design Pro Pad v2.  As you can see, the Think Tank padding is much more substantial.


Even though I'm a big fan of Peak Design and own almost all of the products they have launched, they tend to lean more on aesthetics rather than functionality.  Below is the Think Tank compared to both v1 and v2 of the Peak Design Pro Pads.


Peak Design's original Pro Pad also gave you the choice of horizontal/vertical mounting, but their latest version (v2) only allows horizontal mounting.


One of the benefits of the Think Tank version is even though the packaging shows the Peak Design Capture Clip mounts horizontally, the Peak Design Capture Clips (both V2 and V3) can be mounted in either vertical or horizontal configurations.

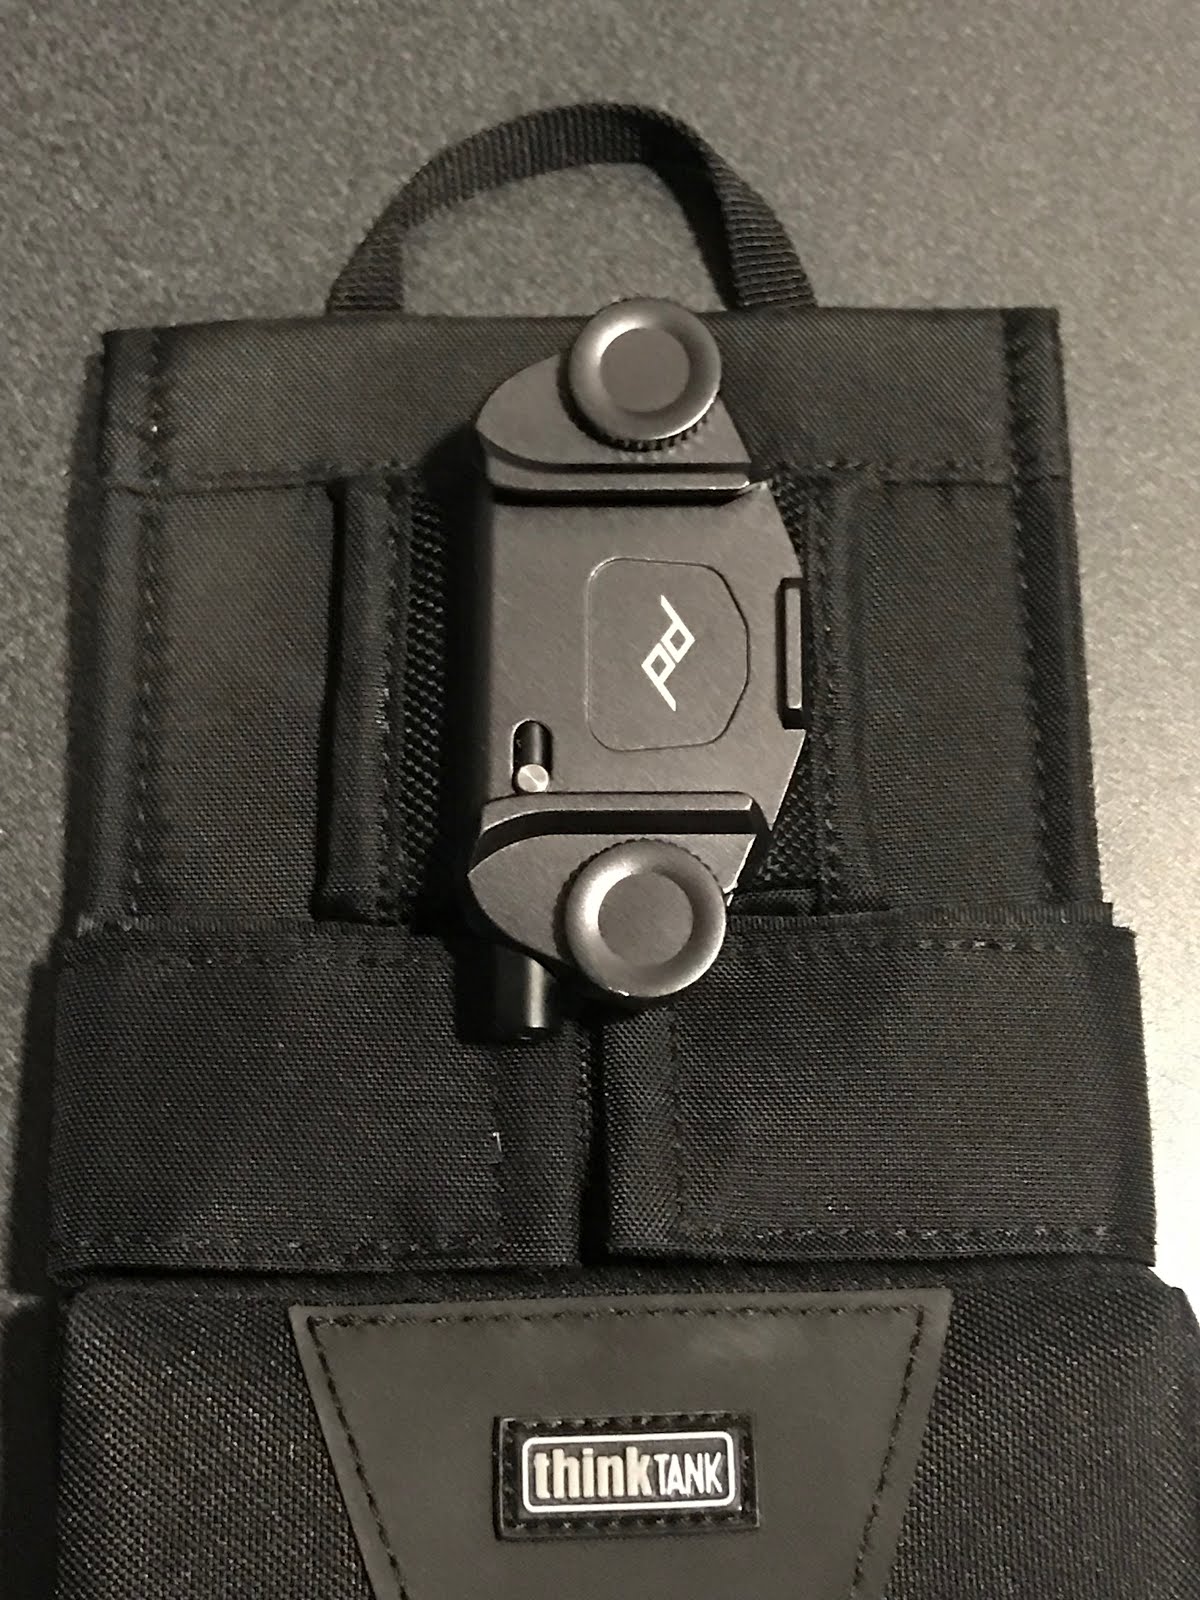

The Think Tank Capture Clip Adapter also has more padding than the Spider Holster Pad.


There is one thing that I need to point out - when I first received the Think Tank Camera Clip Adapter for this review, I noticed two small vertical stitches on the Pad which were not on the example photo of the packaging:

These stitches prevented the Spider Holster from seating in all the way.


I contacted Justin at Think Tank Photo's customer service and was told this was probably a manufacturing defect and so they shipped out a replacement right away.  Unfortunately the replacement had the exact same stitching.


So I contacted Justin again and was assured that this was also a defect - those two stitches are not supposed to be there.  They are currently looking into this issue and he assured me this this issue will be corrected.

Instead of waiting for them to send a second replacment, and in order to get this review out in a timely manner, what I ended up doing was use a knife to carefully cut away the two stitching errors.


Once that was done, the Spiderholster slid in all the way and fit snugly against the pad like it is supposed to.


Let me be clear - I do NOT recommend doing this modification on your own as you could very easily injure yourself if you're not careful. If your Camera Clip Adapter has these stitching errors, notify Think Tank Photo's customer service for a replacement.

Using the Think Tank Capture Clip Adapter V3.0 with a gripped Sony a7rii and a 70-200mm lens on several wedding and model shoots, it made a world of difference compared to the Peak Design pad or the Spider Holster Pad.  There's just no comparison - it beats them by a mile.


After using the Think Tank Photo Camera Clip Adapter 3.0 for two weeks, my verdict is this:

Don't even bother with either the Peak Design Pro Pad or SpiderHolster's pad and just get this. If you use the Think Tank belt system with either the Spider Holster or Peak Design Capture Clip, the Think Tank Capture Clip Adapter v3.0 is definitely a must have.

If you found this review helpful, please consider using the links on this page to visit the Think Tank website.  A small percentage of the sale goes toward helping us keep this blog going so that we can continue to do these reviews for you.

Friday, July 6, 2018

Photoshoot with Anya - my first Russian model


One of the things I enjoy most about photographing models is meeting people from all over the world so when the opportunity came along to work with Russian model Anya who contacted me via Model Mayhem, I did not hesitate.

We both had tight schedules during the time she was visiting Maui, so we had very little time to arrange a shoot together.  Luckily, we were able to pull off two photoshoots that incorporated three separate locations.


We started early in the morning in Kapalua, in a jungle setting.  Had to put up with a lot of mosquitos, but it was so worth it beacuse the morning light coming through the trees was amazing.


For lighting we used a Cheetahstand CL360 in a small white shoot thru umbrella as our main light with the sun as her backlight.


On a couple of poses we had some hard sunlight coming through the trees and falling on Anya so we propped up a Lastolite Trigrip Diffuser Panel to keep that off of her as needed.


Anya is definitely one of the bravest models I've met, lying down in the middle of the jungle like that without caring about the hundreds of spiders, centipedes, or the many other creepy crawlies that were probably underneath all that.  Just thinking about all that gives me the heebie-jeebies!


We then rushed to our second location in Kapalua which was at Dragon's Teeth.  I've shot on the north side of this spot before with a few other models, but because of the position of the sun around the time we got there, Anya and I went to the opposite side of the rocks to find some shaded areas to work with.


Anya changed into her Bohemian look for this set.


Because this area is very windy, any light modifiers such as a softbox or umbrella would have immediately ended up in the ocean.  The extremely rocky terrain also made it difficult to find a spot near the model to position the lights close to her and still be out of the frame.  We ended up shooting the light from a fair distance - two Cheetahstand CL-360s provided just a touch of light.


The next day was a short photoshoot at Makena Cove in the morning. Used the Cheetahstand CL-360 in a Cheetahstand QSB silver beauty dish.


On this day it was slightly over cast, so we didn't have to fight the sun too much.  The flash was used just to add a bit of fill as needed.


Really enjoyed working with Anya on this series of images.  My only regret was that I forgot to have her teach me how to swear in Russian. ;-)

Thursday, July 5, 2018

Gear Review - Think Tank Photo Flash Mob V3.0

Today we take a look at the Think Tank Photo Flash Mob V3.0 pouch.  This is a pouch designed specifically to hold hotshoe flashes and spare batteries.


On the left and right sides are two small pockets which are sized perfectly for 4 AA batteries each (for a total of 8 extra batteries).


If you're a fan of the Godox series of hotshoe flashes that feature the lithium ion battery packs, those batteries will also fit in the side pockets - though it's a pretty tight fit and you won't be able to close the cover flap.


The front face of the pouch has a large stretchy pocket which can hold an 8-cell external battery pack such as the Canon CP-E3.


The Flash Mob V3.0 will accommodate just about any type of hotshoe flash - with or without modifiers.


The Godox AD200 fits just fine as well.


With the recent release of the extension head for the AD200, at first I thought I could run it from the pouch.


However, that would block the vents on the sides of the AD200 and lead to overheating.  A better solution is to use either the Peak Design Capture clip or the Spiderholster and attach it to the ThinkTank Camera Clip Adapter instead.


Like the rest of the V3.0 Modular series, the rain cover has now been integrated into the bottom rear of the pouch, allowing for quicker one-handed access.


The top of the pouch is designed in such a way that it can be flipped open so that you have quicker access to your flash. Useful if you want to keep a modifier on the flash during a run and gun shoot.


If you use the MagMod series of flash modifiers, the pouch can accommodate a flash with a MagGrip installed.


For weddings I usually keep a Godox V850 flash with a MagGrip attachment in this pouch. I store a MagGrid and MagGel holder in the front pocket.


This allows me to snap on a MagSphere or a MagBounce to the front of the pouch when I'm not using it.


Overall the Think Tank Flash Mob V3.0 is a great way to keep a hotshoe flash handy when you're running and gunning.

As always, if you find this review useful please consider using the links on this page to purchase your Think Tank gear.  A small portion of your purchase goes to helping us maintain this blog and allow us to continue doing gear reviews.

Friday, June 22, 2018

First Las Vegas Photoshoot with Natasha Tyler

My apologies to those of you who actually take the time to read this blog.  I've been busy with other commitments and have not been able to keep up with the BTS postings of our shoots.  Have a bunch of them that I'm working on and I will get them up online as time permits.

Went to the NAB (National Association of Broadcasters) trade show a while back and since both the Star Trek Experience is no longer there and I'm not into drinking or gambling, I had some free time to schedule a couple of photoshoots and make some new contacts in Las Vegas.  The first of our two shoots was with Natasha, a model I met through Model Mayhem.


For this shoot we were working out of a TINY hotel room, so it was a challenge to try to find angles that would look good. Decided to use mostly prime lenses and shoot wide open to throw the background out of focus as much as possible. This entire shoot was done with the Sony a6000 with 3 lenses - the 35mm f1.8 OSS, 50mm f1.8 OSS and the PZ18-105mm F4 G OSS lens.

Our first set was a simple headshot next to a window. We improvised a reflector by holding up a white shoot thru umbrella right next to the model's face just out of the right side of the camera frame.


Not only was the room tiny, the furnishings were so old that they still had an old tube style television instead of a newer flat screen LCD or LED.  In this shot of Natasha in a black evening dress we hid that by carefully positioning the camera angle so that we could hide it behind her.


The lighting for this shoot was mostly natural window light mixed with a Cheetahstand (Godox) CL360 with a white mushroom adapter firing into the ceiling next to the camera position.

A Cheetahstand (Godox)V850 in a Westcott Apollo Strip was used to add edge lighting to the model.

The same lighting setup was used in this shot of Natasha reclining on the bed in her second evening dress.


Natasha was as great model to work with.  Was even up for having some fun with a "geek glamour" type shot. Again we used the camera position to hide unwanted elements in the background.  Sometimes it came down to where if either she or the camera moved even an inch to either side, we'd see stuff in the background.  Lots of trial and error on this shoot.


To close this shoot, Natasha changed into a white mens shirt and we had her recline on the bed for a few implied shots.  Would have liked to have gotten a higher vantage point for the camera, but the low ceiling didn't give us enough clearance to frame her properly.


All in all it was a lot of fun for my first official photoshoot in Las Vegas. A big Mahalo to Natasha for being such a great subject to photograph!

Monday, June 18, 2018

Gear Review - Think Tank Photo Hubba Hubba Hiney v3.0


The Hubba Hubba Hiney is one of our favorite Think Tank Bags to use when shooting with a mirrorless setup. Think Tank Photo recently came out with a V3.0 of this bag and although they do have an introductory video on their website, we received a sample to review and go a little bit deeper into the changes they have made compared to the older version.

You can find the specs for this bag on Think Tank's product page.  Overall the size/weight is about the same.  Color-wise they've gone with all black this time around which I personally prefer.


The front pockets have been enlarged and now extend to the bottom edge of the bag.


The loops to connect the shoulder strap have been replaced by metal D-rings.


They've also changed the rain pouch. In the previous version, the rain pouch was completely removable and was hidden in a zippered section between the front pocket and the main compartment.


In the new version, the rain pouch is now a part of the bag, and is is stored underneath the bag instead of between the front pocket and main compartment. This means less bulk in the wall between the front pocket and the main compartment.


This is accessed from the bottom rear of the bag and is closed with velcro instead of a zipper - making it easier to quickly take out and cover the bag with one hand while you're holding your camera. This is a welcome change for me - since I shoot a lot of weddings at the beach, over time the salt air can cause metal zippers to jam when they're not used much.

Inside the main compartment has not changed much if at all.  Some minor cosmetic differences but that's about it.


There are a couple of big changes though. One of the most notable changes is to the back of the bag - the belt loops are still there, but the velcro and plastic tab have been removed.  


Meaning you can't just slip over and onto your Pro Speedbelt like the older model - now you'll have to thread the belt through the loops.  


If you keep your belt setup configured a certain way all the time, this isn't much of an issue.  For me it's a bit of a hassle, because I use different pouch configurations depending on if I'm shooting photo or video.

The other major change to this bag is the front pocket. One of the things I found really useful about the Hubba Hubba Hiney is the organization and key/Pixel Pocket Rocket tether clip that is in this pocket.


In version 3.0, the organizational pockets and the tether have been removed.


Overall, the Hubba Hubba Hiney v3.0 is still a very useful bag for mirrorless shooters.  I'm able to fit a Sony a6300, 10-18mm wide angle lens, 35mm and 50mm prime lenses stacked on top of each other, and a small flash in the main compartment. Although I like the change to the rain cover, I really wish they had kept the organizational features of the front pocket and also the velcro style belt loops on the back of the bag.

If you find this review useful, please consider using the links on this page to purchase your Think Tank gear.  A small portion of your purchase goes to helping us maintain this blog and allow us to continue doing gear reviews.