Showing posts with label computer. Show all posts

Wednesday, April 11, 2012

Photography Workflow


My apologies for not posting in a while. A friend of mine recently asked me to share my photography workflow so that's what I've been working on.  Please keep in mind that I am by no means an expert in photographic workflows.  If you want to learn about really good workflows, Chase Jarvis has an excellent post about it.

Since I am on a much smaller scale, what I am describing here is not very elaborate.  Just a workflow that I have found that is simple and works for me.

Most of my editing is done on a dual quad-core Mac Pro.  I also use a 15" MacBook Pro when on location.

The software programs I mainly use are Adobe Lightroom 3 (soon to be 4), Adobe Photoshop CS5, and Carbon Copy Cloner.

There are 4 internal drives in the Mac Pro:

1. Main - an SSD drive that holds the OS and Application files
2. Work - all photo/video editing is done on this drive
3. Backup - used for backup copies of all current projects
4. Time Machine - uses the Time Machine feature of OSX to back up Main & Work drives

On my Work drive, I start with a template - which is simply a folder with a blank Lightroom catalog file in it.


To begin a new project, I duplicate the template folder and rename the copy with the job number using the following format: YEAR/MONTH/DAY/TYPEOFSHOOT/CLIENTNAME. The blank Lightroom catalog file within the folder is also renamed to the same format.


For example, I was recently part of a joint shoot with local artists Kahulani Davis and Ben Kikuyama. The model's name was Marissa and we shot on March 6, 2012, so the folder name and Lightroom catalog name would be labeled as: 20120306MS-Marissa


Some photographers like to use one main catalog in Lightroom that contains all their shoots.  I prefer to make a separate Lightroom catalog and folder for each particular job.  It's easier for me to keep track of shoots this way.


The RAW files from each card of the shoot are then copied into individual subfolders within this project folder. Each card gets it's own subfolder. I don't use any special software to do this, simply drag and drop on the desktop.


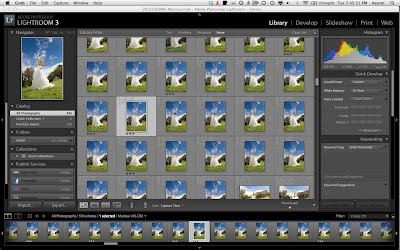
In Lightroom, the subfolders with the RAW files are dragged into the Library module so that I can see the thumbnails of each image before importing.


Images that don't need to be imported, such as lighting tests, shots where the flash didn't fire, etc. are deselected. After adding in the metadata of the shoot, copyright info, etc., a  Develop Preset is selected and the files are imported.


The Develop Preset applies the Lens Correction option and the Camera profile to each image.  The specific settings are based on a Lightroom Develop preset that I found which was originally created by photographer David Ziser.  You can learn more about this preset by going to his blog.

In the Develop module of Lightroom it is possible to apply the Lens Correction and Camera profiles to the images after they have been imported, but I have found that applying these via the Develop Preset during import saves a lot of time.


After importing, all the images are selected and renamed with the client name and a 3 or 4 digit sequence depending on how many shots were taken.

Once this is done, I exit out of Lightroom and backup the Project folder to the Backup Drive using a program called Carbon Copy Cloner. It's fast and verifies the transfer afterwards to insure file integrity.


This way I have the images in three locations - on the Work drive, Backup drive, and on the original cards.  Once the Compact Flash cards have been used on a shoot, they are not formatted again until just before the next shoot, and ONLY if they have already been backed up.

Once the folder has been backed up, I work only with the Lightroom catalog and Raw files that are on the Work Drive.

Back in Lightroom, I start going through the images using the 1-5 star rating in Lightroom to mark the ones to process (3 stars for "Like", 5 stars for "Really Like").


After the selects are marked, I set Lightroom to show me only the selected images.  These are then adjusted in Lightroom for basic exposure and color.


Retouching and major editing/compositing for each image is then done in Photoshop.


Once the editing is completed, the image is saved in Photoshop, which brings it back into Lightroom as a TIF file and appends "-Edit" to the end of the filename. This file appears next to the original Raw file in the Lightroom catalog, so that I can see the before and after.


When all the edits are done, I switch back to the Library module and select all the images that have "Edit" in the filename.


These are then exported out of Lightroom in 2 sizes - a hi resolution version for printing and a lower resolution version optimized for the web.  The web sized ones are then emailed to the client and the hi res versions are burned onto a CD for delivery.


One tip I recently learned is that when you are exporting a large amount of JPEGs, you can save time by doing multiple exports of smaller batches.  Since Lightroom is now 64-bit, it can handle multiple tasks at the same time.


Say for example you had to export 400 images.  Instead of selecting all of them and exporting them all at once, select 200 to export, and while those are exporting, select the other 200 and export them at the same time.  This might be even faster if you did 4 batches of 100, but it depends on the amount of CPU cores you have available in your machine.

For the final backup, I use Carbon Copy Cloner again to do an incremental backup.  This backs up just the edited TIFs and the updated Lightroom catalog to the Backup drive.  The RAW files remain untouched.

To archive the project, I also use Carbon Copy Cloner to copy the backup folder to a remote storage drive which is in a separate location from my work computer. A copy of the final images is also burned to a CD/DVD for filing as an additional backup.


Hope this gives you some ideas on how to setup your workflow.  The most important thing to remember is BACKUP YOUR IMAGES. A good rule of thumb is the 3x3x3 rule:

1. Make 3 separate copies of your images.
2. Use 3 different drives or types of media.
3. Store them in 3 separate locations.

If you have any questions or suggestions on how to improve this workflow (I'm ALWAYS looking for ways to improve my workflow) feel free to leave a comment on the blog or email me directly.


Monday, August 17, 2009

Location Laptop Case completed

It took me a while to get all the components together, but I finally finished my location laptop case.

I started putting this together after watching the excellent "Location Laptop Case" YouTube video posted by commercial photographer Chase Jarvis.


I pretty much followed the way they designed theirs, with a few minor modifications.

The case is the Pelican 1490 which fits the 15" MacBook Pro. If you are designing one for the 17" model, there is a larger version of this case - the Pelican 1495.

I started with industrial Velcro on the bottom of the case to hold 2 external firewire drives (One main, one backup).


I cut a hole in the divider to route the firewire cable through. I chose to mount the drives with the firewire ports facing the front so that it would be easier to access the ports and on/off switches.

One of the problems I encountered with mounting the drives below the computer was that the MacBook Pro fan would constantly run, due to the heat from the metal casings of the drives. I added an Elecom gelpack on top of the hard drives which is very thin, but also helps to draw heat away from the drives.

There is another hole cut into the side divider to route the firewire cable out from the drive bays and into the side ports of the MacBook Pro. There is a notch cut in the divider to make space for the firewire 400, 800 and USB ports.


Since there is only one USB port on this side of the computer, I have a 4-port Elecom USB hub connected here (The flat white box on the right side of the photo). This allows me to connect multiple additional devices, such as a wireless mouse, Wacom tablet, iPhone charger cable, etc.

A Sandisk firewire 800 CompactFlash card reader is installed in the upper part of the case. The firewire 800 cable is run through the back of the case, down under the foam and up into the side of the laptop.


I also sometimes need an SD card reader, so I found this on my last trip to Japan. It's an SDHC card reader which fits into the ExpressCard slot on the left side of the MacBook Pro.


The MacBook Pro is a slightly older model (not the unibody) with a matte screen. It is encased in a Speck MacBook Pro 15" See-thru snap on case. I like this case because it simply snaps onto the MacBook Pro and protects it from scratches. I then added the Compushade folding laptop sunshade which mounts to the lid of the case.


This makes it easy for times when I need just the laptop itself and not the Pelican case. I can unplug the cables, take just the laptop with me, and still have it protected by the Speck case and the Compushade.


Since I use this laptop for both photography and video editing, I also added a keyboard overlay for Final Cut Pro. You can find this at www.kbcovers.com.


On a recent trip to Japan I found the perfect travel mouse for this laptop. This is the Elecom micro receiver BitGrast mouse. The transmitter for this wireless mouse is TINY!


The pockets in the upper part of the case store the extra battery and power supply. Also keep a few extra model releases in there.


I used to keep a 6x8 Wacom Intuos Tablet in there as well, but it was a pretty tight fit. Planning to keep the tablet at home and invest in the smaller Wacom Intuos tablet for traveling.


When I'm working and have access to an outlet, I slide the laptop slightly up and back so that it rests on the hinge of the Pelican case. This lets me connect the power adapter and gives me access the left USB port (and allows me to connect the R2D2 USB hub at the office). It also gives the hard drives underneath a little breathing room so they run a little cooler.

Things to get in the near future:

1. smaller Wacom tablet
2. decent set of collapsible headphones for video editing
3. external battery with a MagSafe connector (for times when there's no available outlet)
4. Solar charging option?

Monday, July 20, 2009

Eye-Fi Pro + MacBook Nano


I really like shooting tethered to the computer during a photo session because it allows for greater collaboration. Having the images come up on the computer screen during the shoot makes it much easier for everyone - the makeup artist can check for touchups, the model can refine her poses, the stylist can fix any stray hairs, and the photographer can check lighting and focus. It's also much easier on the eyes than having everyone crowd around the tiny LCD on the back of the camera.

My usual setup for model photo sessions is a 15" MacBook Pro, a 19" LCD external monitor, a Canon 5D, and the Canon WFT-E1 transmitter which sends the images from the camera to the computer over WiFi. I like it because there's no cables, which makes it easier for the photographer to move around to get the shot.


While this is great for shoots in studio, it's not that great when you're out in the field, especially at the beach. Sand gets into everything and you're always having to keep an eye on your gear in case it decides to grow legs and walk away from you.

I had been looking for a lower cost solution to use in the field. It took a while, but I found the solution in two parts - a Mac netbook and a wireless SD card.

Netbooks have become very popular recently, due to their low cost and their ability to do about 90% of what most people use a computer for - browsing the web, checking email, viewing video clips, etc.

Apple still doesn't make a netbook, so many people have taken to hacking low cost netbooks such as the Dell Mini 9, Lenovo S10, and MSI Wind to run Mac OS X. You can see a list of compatible netbooks here.

I chose to use the Dell Vostro A90, as it was available from Dell for less than $200, and is pretty much the same as the now discontinued Mini 9 in that it is one of the most compatible netbooks to run OS X on.

I found a very easy to follow guide for installing Mac OS X on this netbook. Once I installed 2 GB of RAM and a 64GB SSD, I had it up and running within a day.

It boots up and runs pretty quickly due to the SSD. I have Photoshop & Lightroom installed on it (Yes, the netbook DOES run Photoshop) and I am planning to use it in the field (the screen is only 8 inches so I'm mainly using it just to check the shots as they go into the computer). This will save a lot of wear and tear on my 15" MacBook Pro.


The next part was the wireless solution. The Canon WFT-E1 is a pretty big unit which attaches to the bottom of the camera via USB or Firewire. It's very bulky and expensive (about $1000). Canon has since come out with newer versions of this device which incorporate the Wifi transmitter into the extended grip for cameras such as the 5D MkII, the 40D and 50D.


A few years ago a company called Eye-Fi came out with an SD memory card for around $100 that included built in wifi capability. It was a pretty amazing product at the time (WiFi from an SD memory card? Wow!), it was very limited in that you needed an internet connection for it to work. It was mainly intended for consumers to upload images directly to the web from the camera. While you could upload from your camera to your computer, both had to be on the same wireless network, meaning you needed a router for the connection to work. It unfortunately did not support ad-hoc connections directly between the camera and the computer.

Thankfully, a few months ago they introduced the Eye-Fi Pro - a 4GB SDHC WiFi card ($149.99) that DOES support ad-hoc connections. This now does about the same thing as my WFT-E1, but for about $850 less.

It took some time to get it setup properly. You need to use a web browser and connect to their website to do the initial setup for the card. Firefox gave me some problems when I tried to switch on the adhoc connection on the netbook to set it up in the Eye-Fi manager software. But once I got it worked out (hint - use Safari to do the web setup), it was smooth sailing. The Eye-Fi website has a forum which was a big help in getting the problems worked out.

So now with this setup, it looks ready to roll. On the Mac netbook, I go to the menu and select "Create Network" and set up an ad hoc connection. I insert the Wifi Pro card into my Canon Powershot G9, turn it on, and we're good to go. I click the shutter and after about 12 seconds, the images pop up in Lightroom. The Eye-Fi Pro supports transmitting both JPEG and RAW files, but for now I'm just having it send the JPEGs to the computer for preview purposes only (I transfer the RAWs from the card back at the office)

I showed this to my buddy Chaz from After6Media, and his first reaction was "I gotta get this!" ;-)

In preliminary distance testing, I was able to get the camera to transmit from a distance of about 70 feet (couldn't test out further because that was the length of the room I was in at the time)

I haven't tried it with my regular cameras yet, as they use CompactFlash media instead of SDHC cards. I do have an SDHC to CompactFlash adapter card that I will use to test in my 5D. I'm also thinking of using it in my 1D MkII which has slots for both CompactFlash and SDHC.

With the Mac netbook, the Eye-Fi Pro, my Canon G9 and a Strobist light kit however, I think I may have found the ultimate mobile mini studio. I'll be testing this out in the field in a couple weeks and will post the results.