Tuesday, September 6, 2011

Studio shoot with Brittney & Valerie / Background Lighting

Canon 5d mk II 70-200 f2.8L IS II iso 100 1/160@f8

Last month we had the opportunity to work with two Maui models - Brittney Baker and Valerie Wessel.  Makeup and hair was done by Kahulani and Ronald assisted us on this shoot.

A white wall can be a very versatile background - it can be white, gray, dark gray, black, or almost any color you can think of as long as you control the light that falls on it.  For this entire series in the studio, the background was the same white wall.  All we did was change the lighting on it.

We began with a white background.  We lit a white seamless backdrop similar to the setup we did last year.

Canon 5d mk II 70-200 f2.8L IS II iso 100 1/160@f8

The main light was an AB800 with a 5 ft Photoflex Octodome to camera left.  We used a silver California Sunbounce Mini reflector on the right for fill.  2 AB800s with umbrellas were used to light the back wall about 1 stop over the main light to make it an even white.  We did a few full length shots, then switched to our next lighting setup.

To drop the color of the background down to gray, we turned off the two AB800s in the back. The Octodome was switched out for a WL1600 with a beauty dish boomed above the model.  The silver reflector was moved to the front and below the model to bounce light from the beauty dish back into the model. We added an AB800 with a small gridded strip softbox and a 1/8 CTO gel to edge light her.  I darkened the edges slightly in Lightroom to put more emphasis on the model.

Canon 5d mk II 70-200 f2.8L IS II iso 100 1/160@f8

Brittney is a great model to work with - not only does she know how to rock her poses, she has a look that is just wonderful to photograph.

Canon 5d mk II 70-200 f2.8L IS II iso 100 1/160@f8

If you look closely at the catchlights in her eyes, you'll see the position of the beauty dish and the reflector below.  There's one thing to be careful about when you have a light boomed above the model.  Actually, there's two things.

First, always have sandbags on your lightstands so that they don't fall over and whack your model's head.  Your model will NOT be happy if it does.  And no, that did NOT happen on this shoot. :-)

Second thing is to study the model's eyes.  Some models have deeper set eyes and if you have the light too directly above them you'll start to get shadows in the eye sockets, which isn't very flattering.  If that happens, start moving the light towards the front of the model's face while taking a few test shots until you can start to see the catchlights in the eyes.

For Brittney's next outfit, we went with more of a Hollywood glamour lighting style.

Canon 5d mk II 70-200 f2.8L IS II iso 100 1/160@f8

We used an AB800 with a gridded small strip softbox and a 1/8 CTO gel up above the back of the model to light up her hair.  We took away the beauty dish light and lit the front of the model using 2 AB800s - one with a gridded medium softbox for fill and one with a 7" reflector and a 10 degree gridspot which was aimed at the model's face.   The fill light was set to about 1 stop under the gridspot light.

Because we were using grids on the light modifiers to control the directions of light, we were able to keep most of the lights from hitting the background, which made the white wall go almost completely black.

Don't have the exact lighting measurements because I didn't have my light meter that day so we had to eyeball it. The overall effect we wanted to achieve with this lighting setup was a more dramatic look with her face being the brightest part of the image, in order to draw the viewer's eye to it.

One of the main difficulties of doing this type of lighting is trying to aim the light that has the 10 degree gridspot on it.  The gridspot turns the light into a very narrow beam that has to constantly be re-aimed at the model's face as she moves from pose to pose.  Miss it by just a little bit and her face will not have as much impact.  This is one of those times when you REALLY need to have an assistant.

Canon 5d mk II 70-200 f2.8L IS II iso 100 1/160@f8

An added benefit of keeping the fill light off of the background and feathering the light (meaning not aiming the fill light directly at the model, but rather aiming it so that the light skimmed across her front), was that the shadows that it created helped define the folds of the dress which made it look more interesting.


Canon 5d mk II 70-200 f2.8L IS II iso 100 1/160@f8

When we started photographing Valerie in her blue dress the folds of her dress really stood out in this lighting setup.

Canon 5d mk II 70-200 f2.8L IS II iso 100 1/160@f8

Valerie is a very theatrical model, and at one point started playing around with some very dramatic poses.  To match the lighting to what she was doing, we used 2 AB800s with gridded strip softboxes for her edge lights and turned off the gridspotted AB800.  We pulled the softbox fill light off of the lightstand and lit her from underneath as her main light.  This resulted in a more evil look, similar to that of old hollywood monster movies.
Since there was very little light hitting the background wall, we were then able to add a little mood to the image by putting a splash of color to it using a Nikon SB26 on 1/16th power and a red gel.  We gaffer-taped a set of small barndoors to the SB26 to help control the amount of colored light hitting the wall.  We tried different power levels on the SB26 until we got the right amount of color intensity on the background.

A little smoke and lightning effects helped make the final image.

Canon 5d mk II 70-200 f2.8L IS II iso 100 1/160@f8

For our final set in the studio before heading out to location, we went back to a gray background to get setup for a couple of shots of both Brittney and Valerie together.

Lighting for these final studio shots was with the AB800 and Photoflex Octodome for the main light and the two AB800 striplights. Since there was no grid on the Octodome, the light traveled past the models to light up the background a little, making it go back up to gray. While Kahulani put the finishing touches on Valerie, we did a few tests in this light with Brittney in another outfit.

 Canon 5d mk II 70-200 f2.8L IS II iso 100 1/160@f8


Canon 5d mk II 70-200 f2.8L IS II iso 100 1/160@f8

We then brought Valerie back on for our final set.


Canon 5d mk II 70-200 f2.8L IS II iso 100 1/160@f8

These two really photograph well together. There's a nice contrast of calm, collected seriousness from Brittney and the wacky playfulness of Valerie.  They probably could start in their own TV sitcom someday.


Canon 5d mk II 70-200 f2.8L IS II iso 100 1/160@f8


Friday, September 2, 2011

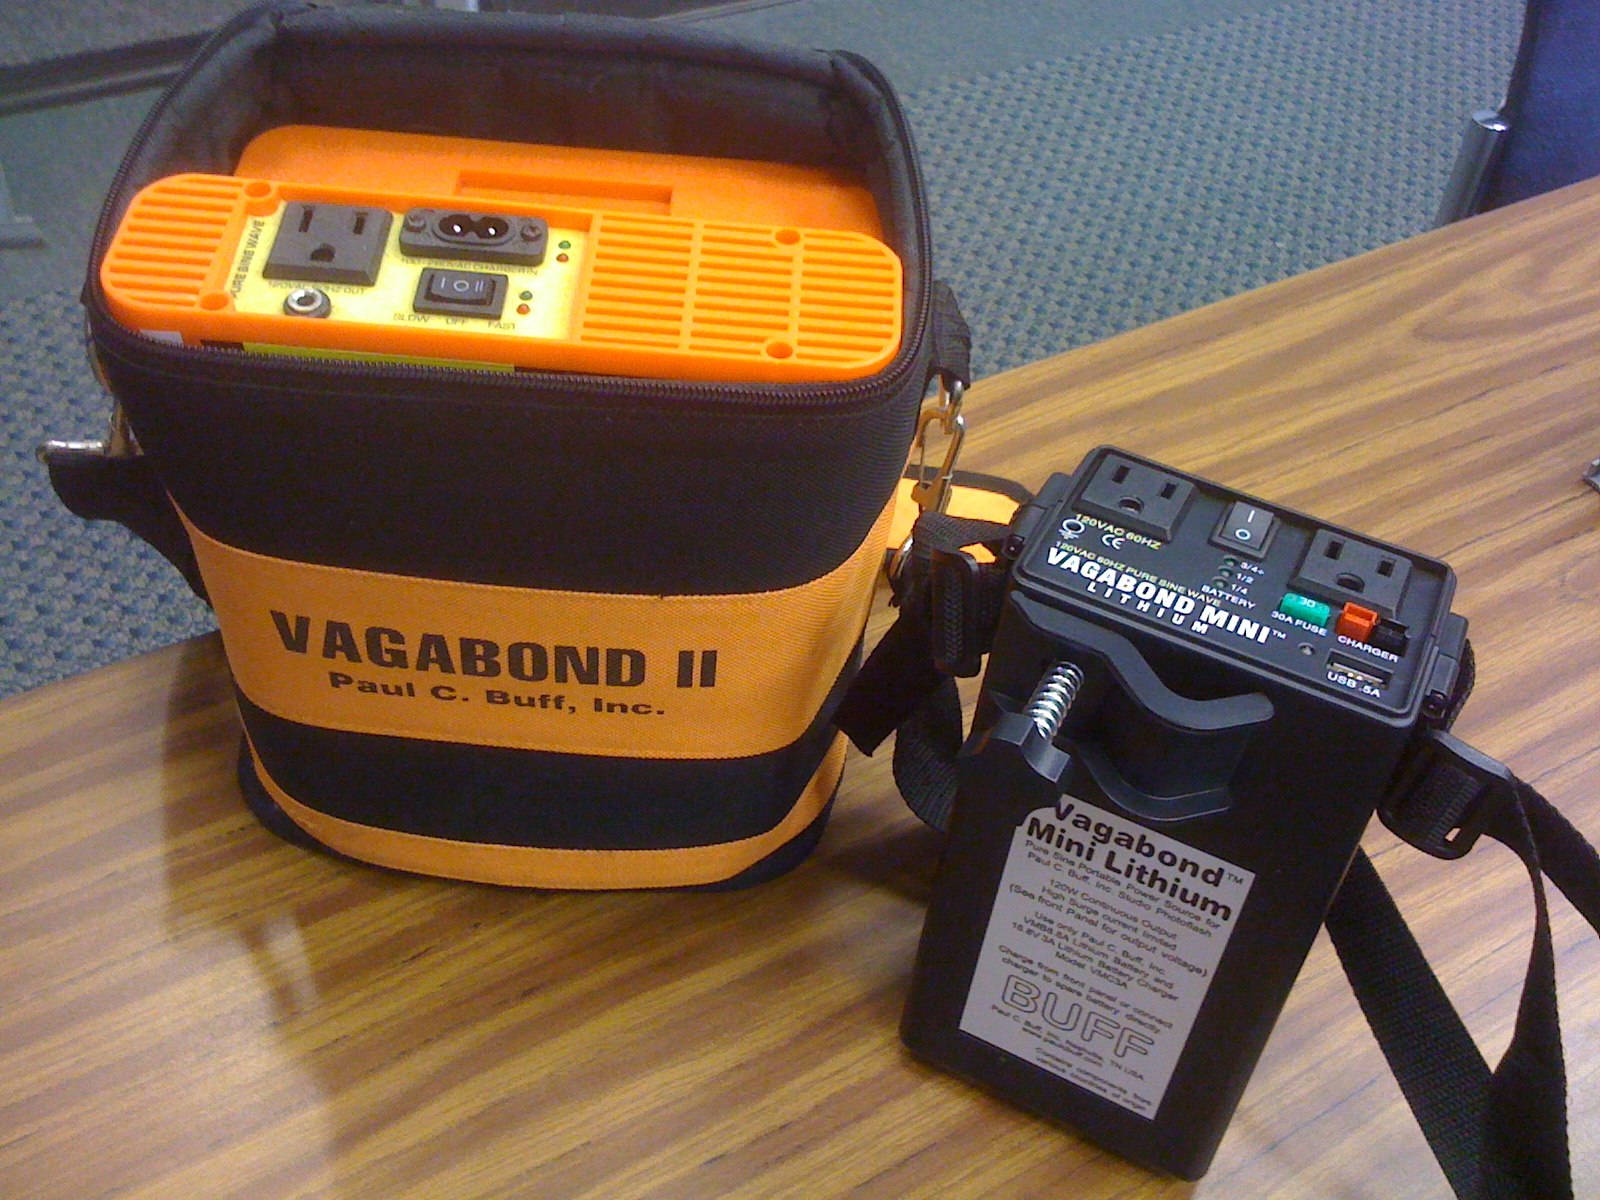
Say hello to my little friend - Vagabond Mini Lithium Review


During the military shoot on Oahu a few months ago, I tested out the new Paul Buff Vagabond Mini Lithium battery pack that I had rented from Photographics Maui (if you are ever on Maui and need to rent photo gear, they are a great resource to check out).


The Mini Lithium battery was a real powerhouse, lasting almost the entire day doing full power shots on a WL1600.  It's much more compact and lighter than the older Vagabond II that I had been using before, and lasts a lot longer.  


Because it's so much lighter, you can't rely on using it as a weight to hold down your lightstand like you can with the older Vagabond II.


The spare battery packs are easily swapped out and are not too expensive. 


One thing I didn't like about the VML is the design of the clip that is supposed to attach the battery to the lightstand.  Not the greatest design - in actual use when you clamp it onto a lightstand, it tends to slide down until it hits one of the joints of the stand.  Hopefully they will improve this in later versions.


Paul Buff also sells a carrying bag for the Vagabond Mini, which can also hold a spare battery.


Putting both the Vagabond mini and a spare battery pack in the bag gives it a little more weight to help hold down a lightstand, but it's a good idea to supplement that with one or two sandbags, especially if you will be using any softboxes or other light modifiers on your strobes.

One future application that I'm planning for this is using it to power LED light panels when shooting video.  In testing it with four HDV-Z96 LED panels, it seemed to hold up pretty well.  Will need to do a stress test with it to see how long it can last without anything blowing up.

Overall I'm really happy with the Vagabond Mini Lithium - it's lightweight and lasts long. It's also very affordable, to the point where I'm seriously considering getting a few more of these - one for each lightstand.


Thursday, September 1, 2011

Working with Radiopoppers again


Canon 5D mkII 70-200 f2.8L IS II lens iso 800 1/200@f4


A few weekends ago I did a quick test session with model Jenni Sosnow from Model Mayhem. I mainly wanted to test out my Radiopopper PX triggers which I hadn't used in a while.

The reason why I haven't been using the Radiopoppers lately is for a couple of reasons.  First of all, the bracket used to mount the receiver to the front of the flash is made of plastic.


I've gone through about 2 or 3 of them already because the hotshoe mount of the baseplate consists of two teeny little tabs of plastic that have a tendency to crack.  Probably doesn't help that I'm rough on my gear to begin with, but I really wish they would make a stronger version.


Another reason is storage.  The plastic mount with the trigger adds a lot of bulk to the 580, making it difficult to store in my camera bag if I want to store the whole assembly together.

I've been looking for a container that lets me store the trigger, 2 receivers and 2 sets of the mounts separately from the flash.  I recently came across the Pelican 1060 case which seems to fit the bill, although it is a little bulky.

Pelican 1060-025-100 Micro Case with Clear Lid and Carabineer (Black)


The final reason is battery life.  The Radiopoppers have a built in battery level indicator (1-10) on their lcd display, and I've found that anytime I've tried using batteries less than "7" on the scale, it didn't always trigger the flashes reliably. I've settled on using Energizer lithium AAA batteries, and being very careful to take them out of the Radiopoppers if I'm not going to use them for a while (I had left some Duracell AAA batteries in there for a couple of months one time and had one leak battery acid all over the entire compartment).

For this test session with Jenni, I used a Canon 5D mkII and a 580EX II flash on a stand with a Radiopopper receiver and modified with a small Photoflex LiteDome. I triggered this via a 580EX on camera with a Radiopopper trigger. On this day it was overcast, so I mainly used this setup to add some directionality to the existing flat lighting.


I had the softbox in very close, just out of frame (the second flash that you see in this behind the scenes shot was not used in the final image).  Raised it up as high as it could go so that I could tilt the light down and get close to a Rembrandt style of light falling across her face.


Shot this in aperture-priority mode with -1 exposure compensation to darken the surrounding area a little. By using the softbox in close and slightly overpowering the ambient light, I was able to darken the shadows below her chin to help shape her face for the look that we wanted.

Canon 5D mkII 70-200 f2.8L IS II lens iso 200 1/800@f2.8

Sunday, August 28, 2011

Quick Tip #2 - What to after you've accidentally erased your memory card

This is just a follow up to the previous quick tip.  In the unlikely event that you do accidentally erase a memory card in the middle of a photoshoot, (yes, I have done it), here's what to do:

Immediately after you've erased the card (and I mean, IMMEDIATELY), turn off the camera and remove the erased card.  Screaming "oh sh!t oh sh!t oh sh!t"/pounding your head against a wall/slapping yourself is optional.

Quarantine the card - keep it separate from your other cards until you get back to your computer. This is very important - Do not record anything else to that card until after you have recovered your images from it.

Use file recovery software - there are a number of programs out there that can recover erased images.  We use the Sandisk Extreme brand of CompactFlash and SDXC cards, which come with a free file recovery program called Rescue Pro.


This software has saved my ass safely recovered lost images on several occasions.  You simply start up the program, insert the card into a card reader and tell the program where to save the recovered images (such as a folder on your hard drive.  Do not try to recover the images by re-saving them to your memory card).  Then let it go and do it's thing.  It will take a while, but you'd be surprised at what it can recover.

Formatting erases the catalog on the card that tells the computer where the images are on the card.  The images are still on the card until they are overwritten by another image.  As long as you do not record anything onto an accidentally formatted card, you stand a good chance of recovering what you lost.


Saturday, August 20, 2011

Quick Tip - Formatting your cards in camera

Before every photoshoot, one of the items on our checklist is to format the CF cards in-camera.  We always check first to make sure that the previous shoot on the CF cards is backed up in at least 3 different places (hard drive, CD, online - you can never be too careful) before we format the cards.

One little tip about formatting the cards in-camera before a shoot.  Immediately after you format the card, it's a good idea to change the menu item to something other than "Format".  I'm not sure how it is on Nikons, but on Canon cameras, whenever you press the "Menu" button, it always goes to the last thing you selected in the menu.


If you left it on "Format" and hit the "Set" button while in the menu, you are just a couple of clicks away from erasing everything on your card. When you are running and gunning, like at a wedding, it's all too easy to forget. The LAST thing you want to do is to accidentally format a card in the middle of a shoot.


After formatting a card in the camera, I'll usually move the menu selection to the top of the Tools page,


then tab over to the next screen and select something harmless like "Highlight Alert" (in case I want to turn off the blinking highlight warning when showing the image on the back of the camera to a client.).  This greatly reduces the possibility of dumb old me accidentally formatting the card.


It takes less than a few seconds to do this, and once you get into the habit of doing it, you'll save yourself a lot of potential aggravation.

Saturday, August 6, 2011

Riding the Rocket - Military Shoot Part II


For one of our setups at the Naval Air Museum, we did a take on the classic scene from the movie  "Dr. Strangelove" where Major Kong rides the atomic bomb as it's dropped from the bomber.


We had neither the budget nor the equipment required to actually suspend a rocket and a model safely in midair so we had to do a lot of improvising with what we had.

The bomb (actually a target drone) was mounted on a cart so that it could be wheeled around easily. We had to figure out how to shoot and light it so that a minimum of post-production work would have to be done.

We started by pointed the rocket into the wind so that when the model was in position on the rocket, the wind would be blowing her hair out behind her.


After shooting it from several different vantage points, we settled on an angle not completely sideways and not completely straight on to the camera, but just enough off center so that you can tell it's a rocket.  Shooting from a low angle would put the model against the blue sky, and make it easier to take out the buildings in the distance behind the rocket.

Had to lie flat on the ground to get this camera angle.  When you are looking at a scene and are trying to figure out the best angle to shoot it at, don't forget to look at the scene from different heights as well. Get down low on the ground or climb up on a ladder or something.  You never know when you'll stumble across a really cool shooting angle when you change the height of where you position the camera.


A few test frames revealed that the undercarriage of the rocket body was a little dark.  To help sell the illusion of the rocket flying through the sky, we laid out the white material of a  California Sunbounce Sunswatter on the ground in front of the rocket to bounce some sunlight into the shadow areas.


We used a WL1600 with a beauty dish for the main light with the sun as our hairlight. To help put more of a rim light on the model (and simulate the glow from the rocket engine) a second light was added to the scene - an AB800 with a 7" reflector positioned near the tail of the rocket.


While the model was getting her makeup touched up, I shot some background plates of the clouds in the sky that I would later composite behind the model to make it look like she was soaring through the air.


I used a small aperture, around f11, added a ND filter so that I could set the camera to a very slow shutter speed and panned the camera across the sky while pressing the shutter button.  It took several tries until I got the right blend of blurred clouds and sky.


Once Alyssa was ready, we started shooting different poses on the rocket until we got a couple of good shots to work with.

One of the final composites: