On the last Sunday before I headed up to Tokyo, we did a location shoot with model Shawna. Assisting us again were Ronald and Quddus.
We had originally planned to shoot in the Olinda forest upcountry, but due to the weather, we ended up changing locations to Kepaniwai Park in Iao Valley. This actually wound up being better because it gave us several different looks in the same location.
Kahulani did an excellent job with the makeup as always. Kat added little gemstones to Shawna's face and hair as we were going for a fairy in the forest kind of look.
For these first couple of shots, I had the camera on tripod, shooting with a slow shutter speed to blur the water. One thing I need to remember when doing a slow shutter speed shot is to make sure the model is in a pose that she can comfortably hold still for the amount of time it takes to make the exposure.
It was really nice having Kat on location with us. Not only was she able to touch up Shawna's makeup when needed, she also helped out in choosing spots to shoot in.
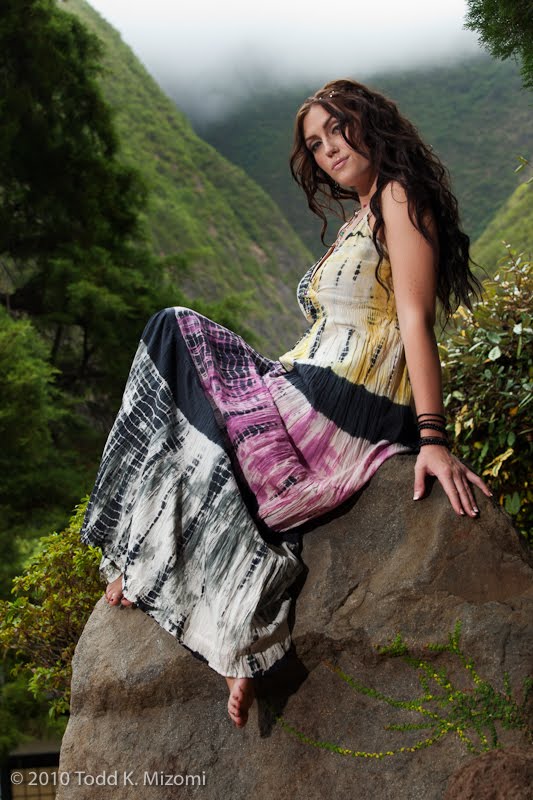
For example, Kat visualized this shot of Shawna on the rock with the misty mountains in the background.
In order to get the angle I wanted for this shot, I had to position myself really low.
Here I started off with the Canon 5D and 70-200mm L lens on a tripod (can't afford the IS version of this lens yet), but couldn't get it low enough. So I ended up tossing the sticks and lying down on my back in the waterfall with the camera and lens on my chest. Not something I'd recommend doing very often, but sometimes "ya gotta do what ya gotta do" to get the shot.
We used an AB800 powered with a Vagabond battery pack (finally back from repair) with a long throw reflector to fill in the shadows from across the waterfall. (In the BTS shot above, Shawna and the rock are just out of the frame to the left and the AB800 setup is just out of the frame to the right behind Quddus.)
By the time we started shooting in Iao Valley, it was quite overcast and we were starting to lose the light. I wanted to do a shot that looked like early morning, with the sunlight streaming through the trees, so we used two Nikon SB26s triggered with Pocket Wizards, and a California Sunbounce micro mini reflector to simulate the sunlight.
One of the nearby trails in Iao Valley goes through a grove of bamboo trees. We picked this spot to setup our shot.
Because the sun was hidden behind the clouds, there was not much light to reflect. For Shawna's main light we mounted one of the SB26s onto the frame of the Sunbounce and aimed it into the silver side of the reflector. The extreme lightweight construction of the Sunbounce made it easy for Quddus to hold the reflector up above Shawna and position it as her main light.
We setup the other SB26 on a lightstand and positioned it behind and off to the side so that it would come through the bamboo leaves.
Usually I try to avoid lens flares, but in this case, it kinda looked cool, so we just rolled with it.
For the fairy shot, I wanted to appear as if fireflies and rays of sunlight were lighting the scene. Once we picked out the spot for it, I had Ronald give Shawna an SB26 with a Pocket Wizard ball bungied to it to make it easier for her to hold in her hand. The SB 26 is modified with a Stofen omnibounce. To help flag off the light from flaring into the camera lens, we inserted a small piece of cinefoil (black tinfoil) into the omnibounce, on the side that faced the camera.
We had to play around with the power levels on the SB26 a bit so I'm not sure what we finally ended up at, but the idea was to have it slightly overpower the ambient light so that we had the light direction coming from her hand.
Later in Photoshop, we erased the flash. Since the flash body is mostly black, it blended into the background pretty well. Added some fireflies, wings, and a few rays of light to get to the final image.
Friday, July 30, 2010
Tuesday, July 27, 2010
More studio lighting work with Uilani
Had the chance to work with model Uilani again in Maui a few weekends ago before I flew up to Japan.
Makeup and hair was done by Kahulani. We were assisted by Ronald and Quddus.
For lighting, we used basically the same setup as last time, with two AB 800s lighting the white wall and an AB800 in a large softbox for the main light. To even out the lighting on the background, we used a white shoot thru umbrella modifier on both rear lights.
Uilani had a lot of different outfits and props to use this time, courtesy of Isle Empress.
except for the guns, of course. ;-)
One thing that was a little different this time was that we ended up having a group shoot, since pretty much everyone present had a camera and we had enough Pocket Wizards to go around. A lot of my frames ended up dark because the poor Alien Bees were getting a workout. ;-) But the great thing was that everyone had the chance to get some shots and Uilani had a lot of images to select from.
Wednesday, June 30, 2010
Trying out new studio lighting techniques learned from Zack Arias and Scott Kelby
Earlier this month I attended a virtual workshop on studio lighting by photographer Zack Arias. Hosted by creativeLive.com, the 3 day workshop was broadcasted live over the Internet for free. If you missed it, downloads of the workshop are available for purchase by going here. If you want to learn studio lighting, I highly recommend getting this course.
Zack is an awesome teacher. I learned so much in that weekend and got excited to try out some new ideas in the studio as soon as possible. Luckily, I was able to try those ideas out this past weekend with help from my friends Quddus and Shawna.
Because this was my first time photographing Shawna, we started slowly, doing some simple natural window light headshots using a California Sunbounce mini to lighten the shadows a skosh.
In the studio, the first setup was against a white seamless backdrop - a look similar to the "Get a Mac" ad campaign by Apple.
Setting up this look required 3 lights. We had 2 AB800s aimed at the back wall to blow it out to white. These were flagged off with 2 v-flats to prevent flaring into the camera. We then placed several sheets of Home Depot white panel board on the floor for the model to stand on.
These boards are a little shiny, and when photographed from a low angle, they reflected the background and extended the white background to the floor. For the main light we used an AB800 in a large softbox boomed overhead.
The main light was set at f5.6, and the background lights were metered to 2 stops over the main, at f11.
To see this technique explained in much better detail, visit Zack's blog.
Had to do some minor background cleanup in post, but overall I really liked this technique
The shot below was done in the same setting, but with different lighting:
This was done by turning off the main light, and lighting the model from either side with AB800s in small strip softboxes with grids. This kept the light off the background, letting it go dark. I had Quddus hold a Nikon SB26 with a snoot and a 10 degree grid to spotlight just her face.
I learned this next technique for doing a high key headshot from photographer Scott Kelby.
This used 2 lights and 1 reflector. The white background was actually a light source - a WL800 in a 5 ft Octodome aimed back at the camera. The Octodome was tilted upward at about 45 degrees to minimize lens flare. Shawna was positioned in front of the Octodome, with a light modified with a beauty dish boomed above her. A California Sunbounce micro was placed just below the frame in front of her for fill.
At first I tried this with an AB800 in a beauty dish. I had it positioned pretty close to Shawna, and at the lowest power setting of the AB800 I was getting f11. I wanted to use a larger aperture to get less depth of field, so I replaced the AB800/beauty dish combination with a Nikon SB 26 in a Lastolite Ezybox hotshoe softbox. This let me get down to f2.8. With the addition of a fan we ended up with this shot:
Because the Octodome was only 5 ft in diameter, I shot this with a 70-200mm lens to compress the background and fill the frame with the face of the Octodome.
In hindsight, I probably could have left the AB800 and beauty dish combo for the main light, and put ND filters on the camera lens to get the light down to f2.8. Something to try next time.
Zack is an awesome teacher. I learned so much in that weekend and got excited to try out some new ideas in the studio as soon as possible. Luckily, I was able to try those ideas out this past weekend with help from my friends Quddus and Shawna.
Because this was my first time photographing Shawna, we started slowly, doing some simple natural window light headshots using a California Sunbounce mini to lighten the shadows a skosh.
In the studio, the first setup was against a white seamless backdrop - a look similar to the "Get a Mac" ad campaign by Apple.
Setting up this look required 3 lights. We had 2 AB800s aimed at the back wall to blow it out to white. These were flagged off with 2 v-flats to prevent flaring into the camera. We then placed several sheets of Home Depot white panel board on the floor for the model to stand on.
These boards are a little shiny, and when photographed from a low angle, they reflected the background and extended the white background to the floor. For the main light we used an AB800 in a large softbox boomed overhead.
The main light was set at f5.6, and the background lights were metered to 2 stops over the main, at f11.
To see this technique explained in much better detail, visit Zack's blog.
The shot below was done in the same setting, but with different lighting:
This was done by turning off the main light, and lighting the model from either side with AB800s in small strip softboxes with grids. This kept the light off the background, letting it go dark. I had Quddus hold a Nikon SB26 with a snoot and a 10 degree grid to spotlight just her face.
I learned this next technique for doing a high key headshot from photographer Scott Kelby.
This used 2 lights and 1 reflector. The white background was actually a light source - a WL800 in a 5 ft Octodome aimed back at the camera. The Octodome was tilted upward at about 45 degrees to minimize lens flare. Shawna was positioned in front of the Octodome, with a light modified with a beauty dish boomed above her. A California Sunbounce micro was placed just below the frame in front of her for fill.
At first I tried this with an AB800 in a beauty dish. I had it positioned pretty close to Shawna, and at the lowest power setting of the AB800 I was getting f11. I wanted to use a larger aperture to get less depth of field, so I replaced the AB800/beauty dish combination with a Nikon SB 26 in a Lastolite Ezybox hotshoe softbox. This let me get down to f2.8. With the addition of a fan we ended up with this shot:
Because the Octodome was only 5 ft in diameter, I shot this with a 70-200mm lens to compress the background and fill the frame with the face of the Octodome.
In hindsight, I probably could have left the AB800 and beauty dish combo for the main light, and put ND filters on the camera lens to get the light down to f2.8. Something to try next time.
Friday, June 18, 2010
Studio / Beach shoot with Joy and Anne
Had the chance to work with model Joy a few weekends ago. Makeup artist Kahulani did the makeup for her as well as her friend Anne. We did some shooting in studio, then headed out to Wailea to catch the sunset on the beach. Quddus Ajimine was our assistant.
Joy works out a lot and one of her requests was to do shots that highlighted her physique.
We shot this in a storage room next to the studio. Thanks to a tip I learned from fellow photographer Chaz of After6Media, we used Pam Olive Oil spray to give Joy's body a "wet look".
We used a Paul Buff Alien Bee AB800 with a 22" beauty dish for the main light, and a Nikon SB26 with a 1/4 CTO gel for the edge light. It took a couple of tries to get the SB26 to highlight just the model and not give us a reflection off the back wall. We ended up zooming the flash head to the max and flagging it off from the wall.
For this shot of Anne, we used 3 AB800s. The main light was modified with a large softbox, the rimlight with a small strip softbox, and we had one light shooting through the panels in the back.
My Vagabond battery was still out for repair during this shoot, so I rented a 1000 watt Yamaha generator from a local rental house. We took this with us when we went to the beach in Wailea. Worked out pretty well, so I'm thinking of picking one up in the near future. Nice to have as a backup, plus you can run the modeling lights of the AB800 from it (something you're not supposed to do when using the Vagabond battery).
For the first hour before sunset however, we did most of the shots using nothing but Quddus holding a California Sunbounce Pro silver reflector to fill in the shadows.
Because this reflector is so huge, it really throws a LOT of light where you want it. I shot most of these on Aperture Priority mode on a Canon 1d mkII with a 70-200mm f2.8L lens.
When we got near sunset time, we broke out an AB800 and a 5ft PhotoFlex Octodome (with the interior configured to all gold panels) and plugged them into the generator. Since we were working pretty close to the water, a big safety precaution we took was to plug in a Ground Fault Circuit Interrupter (GFCI) between the generator and extension cord.
A GFCI monitors the current flowing through it. If there is even a slight change (such as if a wave were to wash over the connected power cords, it quickly cuts off the power. The end result is that you don't electrocute yourself (although you may receive a painful shock). You can find GFCIs at any hardware store or Home Depot (The Vagabond battery packs have GFCIs already incorporated into them).
Electrical shocks are NOT fun - I know this from firsthand experience. I try to always use a GFCI when working with strobes on location.
For the shots with the Octodome, I had the camera set to iso 100, 1/250 at f11 and kept experimenting with different shutter speeds to change the exposure of the background.
This was a fun shoot to do. Now that I've got my Vagabond battery back from repair, going to have to test it out on a few shoots. Definitely going to look into getting a generator though one of these days. :-)
Joy works out a lot and one of her requests was to do shots that highlighted her physique.
We shot this in a storage room next to the studio. Thanks to a tip I learned from fellow photographer Chaz of After6Media, we used Pam Olive Oil spray to give Joy's body a "wet look".
We used a Paul Buff Alien Bee AB800 with a 22" beauty dish for the main light, and a Nikon SB26 with a 1/4 CTO gel for the edge light. It took a couple of tries to get the SB26 to highlight just the model and not give us a reflection off the back wall. We ended up zooming the flash head to the max and flagging it off from the wall.
For this shot of Anne, we used 3 AB800s. The main light was modified with a large softbox, the rimlight with a small strip softbox, and we had one light shooting through the panels in the back.
My Vagabond battery was still out for repair during this shoot, so I rented a 1000 watt Yamaha generator from a local rental house. We took this with us when we went to the beach in Wailea. Worked out pretty well, so I'm thinking of picking one up in the near future. Nice to have as a backup, plus you can run the modeling lights of the AB800 from it (something you're not supposed to do when using the Vagabond battery).
For the first hour before sunset however, we did most of the shots using nothing but Quddus holding a California Sunbounce Pro silver reflector to fill in the shadows.
Because this reflector is so huge, it really throws a LOT of light where you want it. I shot most of these on Aperture Priority mode on a Canon 1d mkII with a 70-200mm f2.8L lens.
When we got near sunset time, we broke out an AB800 and a 5ft PhotoFlex Octodome (with the interior configured to all gold panels) and plugged them into the generator. Since we were working pretty close to the water, a big safety precaution we took was to plug in a Ground Fault Circuit Interrupter (GFCI) between the generator and extension cord.
A GFCI monitors the current flowing through it. If there is even a slight change (such as if a wave were to wash over the connected power cords, it quickly cuts off the power. The end result is that you don't electrocute yourself (although you may receive a painful shock). You can find GFCIs at any hardware store or Home Depot (The Vagabond battery packs have GFCIs already incorporated into them).
Electrical shocks are NOT fun - I know this from firsthand experience. I try to always use a GFCI when working with strobes on location.
For the shots with the Octodome, I had the camera set to iso 100, 1/250 at f11 and kept experimenting with different shutter speeds to change the exposure of the background.
This was a fun shoot to do. Now that I've got my Vagabond battery back from repair, going to have to test it out on a few shoots. Definitely going to look into getting a generator though one of these days. :-)
Tuesday, June 15, 2010
Enhancing the light
This was shot in a bedroom that had lots of natural light coming in from all around.
I originally planned to use a Sunbounce to reflect in light from the open deck behind me for Corinne's main light. The late afternoon sun made that difficult, plus we started getting harsh sunlight across the front of the bed. So I repositioned the Sunbounce and C-stand to flag off the sunlight instead of reflecting it.
We were getting good light from all the windows, but it was a little too dark. I ended up using 3 lights to try and bring the surrounding light up just a skosh.
I used 2 Canon 580EX flashes on stands. Each was triggered with a Radiopopper trigger. On the front flash, I used a Gary Fong Whaletail Studio. The background flash had a Gary Fong Clear Lightsphere. I chose to do it this way so that the flash would reflect off of the surrounding walls and surfaces to mimic the natural light coming into the room. I also had my assistant Ronald hold a Nikon SB26 aimed at Corinne's hair to provide a rim light. This was triggered with the SB26's built in optical slave. To keep stray light from the SB26 from hitting the wall, I had Ronald use his hands to manually block the light.
In hindsight, I probably could have gotten away with just 2 lights and used the rear 580EX as the rim light instead of lighting the background. (You can barely see Ronald's head shadow on the door)
I had to shoot this pretty tight - there was a mirror on the headboard , a work area for painting (which Ronald was standing in the middle of) and a home gym setup in the space next to the bed. Just left of this bed is a whole rack of barbells. I ended up using a 70-200mm f2.8L lens on a tripod. Canon 5D iso 400 1/50@5.6
I originally planned to use a Sunbounce to reflect in light from the open deck behind me for Corinne's main light. The late afternoon sun made that difficult, plus we started getting harsh sunlight across the front of the bed. So I repositioned the Sunbounce and C-stand to flag off the sunlight instead of reflecting it.
We were getting good light from all the windows, but it was a little too dark. I ended up using 3 lights to try and bring the surrounding light up just a skosh.
I used 2 Canon 580EX flashes on stands. Each was triggered with a Radiopopper trigger. On the front flash, I used a Gary Fong Whaletail Studio. The background flash had a Gary Fong Clear Lightsphere. I chose to do it this way so that the flash would reflect off of the surrounding walls and surfaces to mimic the natural light coming into the room. I also had my assistant Ronald hold a Nikon SB26 aimed at Corinne's hair to provide a rim light. This was triggered with the SB26's built in optical slave. To keep stray light from the SB26 from hitting the wall, I had Ronald use his hands to manually block the light.
In hindsight, I probably could have gotten away with just 2 lights and used the rear 580EX as the rim light instead of lighting the background. (You can barely see Ronald's head shadow on the door)
I had to shoot this pretty tight - there was a mirror on the headboard , a work area for painting (which Ronald was standing in the middle of) and a home gym setup in the space next to the bed. Just left of this bed is a whole rack of barbells. I ended up using a 70-200mm f2.8L lens on a tripod. Canon 5D iso 400 1/50@5.6
Thursday, June 10, 2010
Changing your perspective
There's a scene in the movie "Indiana Jones and the Last Crusade" where Indy is in a library looking for a hidden symbol. He keeps searching until he comes to the realization that the symbol is embedded in the floor and can only be seen from upstairs.
As photographers, even though we train ourselves to look around our surroundings for shooting locations, we sometimes forget that there can be shots other than at eye level.
When scouting a location, don't hesitate to look at a scene from as many different angles as you can think of, even if it makes you look weird (Todd, why are you sprawled out on the floor? Did you fall down?)
For this shot with Luciane, we started shooting in the living room (the same from my previous post with Whitney), but we weren't happy with the green foliage through the windows as a background. It didn't really work with the black lingerie she was wearing. I racked my brain trying to think of a different background when I had that Indiana Jones epiphany above. I ran upstairs and saw this angle from the second floor bedroom overlooking the living room.
I had Luciane position herself along the edge of the living room floor covering so that she had different textures on either side of her. We then had our makeup artist Kahulani come in and arrange Luciane's hair so that it flowed with her pose.
We lit her with just 1 light, an AB800 with a large softbox on the floor next to Luciane's head.
As photographers, even though we train ourselves to look around our surroundings for shooting locations, we sometimes forget that there can be shots other than at eye level.
When scouting a location, don't hesitate to look at a scene from as many different angles as you can think of, even if it makes you look weird (Todd, why are you sprawled out on the floor? Did you fall down?)
For this shot with Luciane, we started shooting in the living room (the same from my previous post with Whitney), but we weren't happy with the green foliage through the windows as a background. It didn't really work with the black lingerie she was wearing. I racked my brain trying to think of a different background when I had that Indiana Jones epiphany above. I ran upstairs and saw this angle from the second floor bedroom overlooking the living room.
Passion on the Floor, originally uploaded by Mizomi Photography.
I had Luciane position herself along the edge of the living room floor covering so that she had different textures on either side of her. We then had our makeup artist Kahulani come in and arrange Luciane's hair so that it flowed with her pose.
We lit her with just 1 light, an AB800 with a large softbox on the floor next to Luciane's head.
Wednesday, June 9, 2010
Shooting with the California Sun-Swatter part II
Am really liking the flexibility that the Sun-Swatter gives us. This shot of Luciane was made in the middle of the day, just by suspending it above her.
Because it is suspended from a boom arm, the Sun-Swatter allows you to get it into places that would otherwise be difficult.
This was shot in a small corner of a yard, behind a wall and some recycling bins. Our assistant used the boom arm of the Sun-Swatter to fly it up over the wall and above our model Luciane to diffuse the overhead light. A silver Sunbounce Pro reflector is off to the side mounted on a C-stand to throw some light into this corner. We also had our makeup artist Kahulani hold a silver Sunbounce mini below to add some fill.
We also used the Sun-Swatter in a bit of an unorthodox way. This was shot in the living room against the windows. There was late afternoon sun streaming in from the oceanside windows, creating hotspots in the area we were shooting in. A technique I remembered from photographer Joe McNally was to use a white bedsheet over a window to diffuse harsh light. Since we didn't have a bedsheet handy, I took the Sun-Swatter and propped it up against the window - turned out to be the perfect size to cover it.
This softened the light coming into the living room, but also made it rather dark. To compensate, I set up a WL1600 at full power outside and aimed it towards the window.
This had the effect of creating a 4x6 softbox pressed up against the window. We also used a silver Sunbounce reflector in the living room on the opposite side of our model Whitney to fill in the shadows a bit.
Probably not one of the ways the creators of this product intended, but it worked out pretty well.
Subscribe to:
Posts (Atom)


