Wednesday, November 21, 2012

Review - Gura Gear Bataflae 32L Camera Backpack


I usually use a roller bag to get my gear to location, but there are many locations here on Maui where it is not always feasible to do that.  For many years I had been using a traditional shoulder bag when I couldn't use my rolling camera case, but since that bag has finally started to give out, I started looking into camera backpacks.

The Gura Gear line of backpacks is advertised as being one of the lightest camera backpacks on the market.  It is constructed of the same sailcloth material that is used on racing boats.


I decided to go with the Gura Gear Bataflae 32L Camera Backpack.


It came packaged in a dust cover - a nice presentation, and I'm thinking that I could use the dust cover when I need to get down on the ground with my camera.


It has two main handles on the outside of the bag,


 plus a slim one on the bottom to help you get it into the overhead bin of an airplane.


There are M.O.L.L.E. attachments, a pocket, and a tripod strap on both sides of the bag.


The zipper pulls are color coded - the black ones open the outer pockets, the blue ones open the main compartment.


The two main outer pockets run the length of the bag and have various internal pockets for organizing things.


It also comes with a rain cover in a separate external pocket.


One of the main reasons why I chose this bag was because it was designed to open butterfly style, which keeps the flaps out of the mud/sand/dirt when the bag is on the ground.


The previous version of this bag, the Kiboko, only opened in this butterfly style.  With the Bataflae, there is a new feature that lets you open the entire backpack in the traditional manner which makes it easier to load the bag or work out of in an indoor environment. To do this you open the buckle on the top of the bag and unzip the blue zippers to the bottom of the bag. You then open the flap to get full access to the interior.


 The inside of the lid has velcro that runs the length of the bag - this attaches to the center divider when the bag is closed and allows it to open butterfly style.


The main divider that splits the compartment into two sections is removable, but if you want to maintain the sturdiness of the backpack it is probably not a good idea to take it out.


It also comes with a few extra dividers, but not as much of a variety as you get from other manufacturers.


You will notice that the velcro does not cover the entire surface of the dividers.   On the larger dividers, the velcro only covers the center portion.


The same is true for the interior of the bag - the velcro does not cover the corners.


On the floor of the bag, only the center portion is covered.


I'm guessing this was done to save weight, but this may limit some configurations you might want to do.  Personally I prefer to be able to put the dividers in any way I want, so I'm not too fond of this design choice.

The backpack straps are stored in a compartment in the back of the bag.


The backpack is very well padded and comfortable to wear. It will take you a minute or two to set up the straps after pulling them out of their compartment as there are several buckles that need to be connected first.


The upper part of the shoulder strap connects here


The bottom of the shoulder straps and the waist best buckles connect here.


The buckles that connect the bottom of the shoulder straps to the bag are of the 3-point variety instead of the usual 2.  So you have to press both sides of the buckle as well as the center button in order to get it to release.

That bit of extra security means that you cannot accidentally unhook the buckle and wind up having your backpack and your gear come crashing down.

Whenever you have an adjustable strap on a camera bag, there is always the problem of what to do with the excess length.  Gura Gear has come up with a really elegant solution to this.


There is a small velcro strap sewn into the end of the straps - you can simply roll up the excess strap and then velcro it together so that it doesn't keep flapping around.


A very smart idea which I wish more camera bag manufacturers would adopt.


Overall I like this backpack.  Because of the limited velcro on the dividers, I'll have to play around with the dividers to come up with a configuration that works for me. I'll be using this backpack for the next couple of beach weddings and see how it works out.


Wednesday, September 5, 2012

Kojo Couture Fashion Shoot with Brittney pt II


Our final look for the Kojo Couture shoot was a black dress covered in chrome spikes. Koa is a very talented designer and ever since I saw this design of his showcased in a recent UHMC fashion show, I knew I wanted to photograph it.


Ry-n really went to town on the makeup work for this final look, even going as far as to give Brittney a set of long Lady Deathstrike-style fingernails.


It was a challenging dress to shoot. Since the spikes on the dress were highly polished chrome and reflected their surroundings, they tended to disappear when shot in a dark environment like at the fashion show.


Taking a few tips from a recent workshop on tabletop photography by Don Giannatti, I figured that in order to get the spikes to stand out, we would need to surround them with lots of white surfaces to reflect. At the same time we still needed to control the lighting in order to keep the background dark so that we could light it separately.

We used four AB800 lights on the model - two of them with strip softboxes, egg crate grids and CTO gels were used to rim light her. The other two AB800s were modified with a large and a medium softbox, both with eggcrates and were setup in front to crosslight her. We used two white V-Flats positioned close to the model. This both keep the rim lights from flaring into the camera and also gave the spikes lots of white surfaces to reflect.


A single Nikon SB26 with a red gel was used to light the background. To get the pattern on the wall, we placed the SB26 in the ribcage of a skeleton.


We had experimented with using a skeleton as a pattern maker on a previous shoot, and I thought it might work well in this instance since I wanted to evoke the feeling that Brittney had slashed the background with those long nails.

It took us a good 15-20 minutes of test shooting and adjusting the placement and angle of the skeleton and the flash within it before we were able to get a satisfactory pattern on the background.


Things I need to remember next time:

Clean the floor! Have to remember to continually sweep up dust and shoe prints on the white tileboard during the shoot so that I don't have to spend hours taking it out in Photoshop later.

If we can scrounge up enough apple boxes, gonna try elevating the white tileboard next time. This would give us a little more flexibility on placing the background effects lights without having them showing up in the frame.


Monday, August 20, 2012

Kojo Couture Fashion Shoot with Brittney pt I


One of our most recent studio shoots featured designs by Koa Johnson and makeup by Ry-n Shimabuku.  Our model was Brittney Baker and we were assisted by Ronald who also took the time out to take some behind the scenes shots which I always forget to do.  Thanks Ronald!


Our first setup was a white backdrop.  We used 2 AB800s with white shoot thru umbrellas to light the background to 1 stop over the main light. 2 V-flats were used to block the background lights from flaring into the camera lens.


For our main light we used an AB800 in a Paul Buff PLM.  I haven't used the PLM as much as I'd like to since I bought last year.  The main reason for that is because assembling the shaft and speedring of the PLM can take a while.  Plus the whole thing is so freakin' HUGE that I'm thinking I could probably experiment with using the silver interior as a background for a future model shoot.


Setting for all the shots is the same - Canon 5D mk II 70-200mm 2.8L IS II lens, iso 100 1/160@ f5.6.


While Brittney changed into her next look, we took a few shots of her friend Zach, an aspiring male model.

The first few shots against the white background didn't work too well, because we started losing his sleeves to the white backdrop. We turned off the two background lights and lit him solely with the PLM.  The focused nature of the PLM gave us a nice gradient on the background and a vignette around Zach which worked much better with his shirt.


Brittney's next look was in a long red dress. For the first shot we had her get into a reclining pose, spread the dress out around her and shot her from an elevated viewpoint.


The main light was an AB800 in a large soft box. Another AB 800 with a strip soft box was used as a hair light.


The red dress was so visually striking that Brittney and Ry-n named this shot "The Miscarriage".


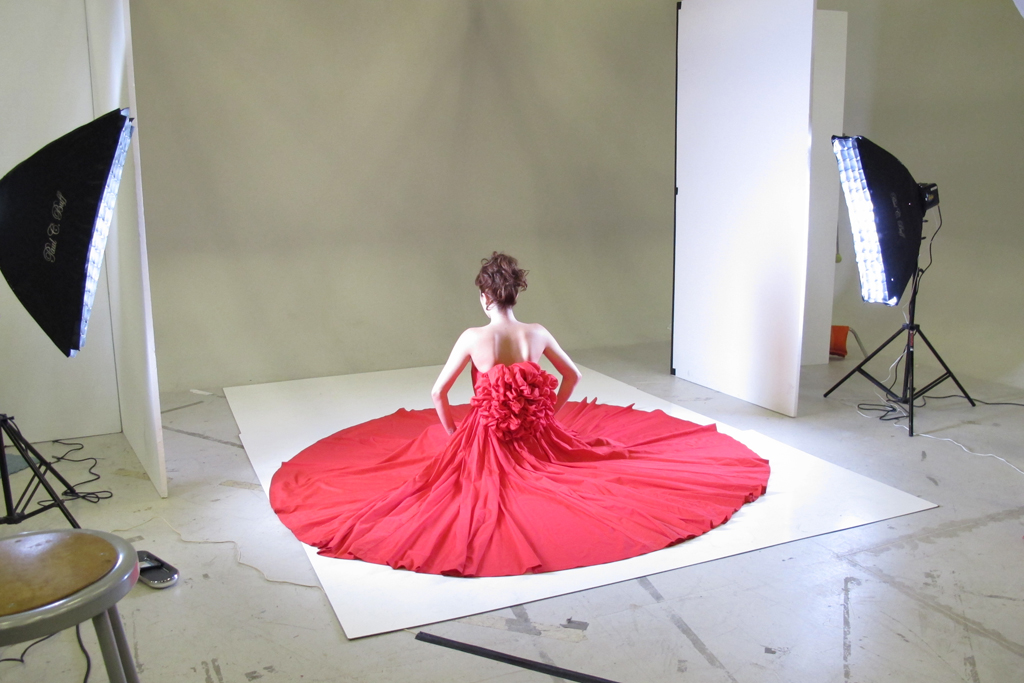
We then had Brittney get into a seated pose facing the back wall.  We cross lit her with 2 AB 800s in small strip soft boxes to make the folds of the dress really stand out.


We used grids in the strip soft boxes and also repositioned the V-flats to block the lights from hitting the background which allowed the white wall to go dark.


More to come . . .