Wednesday, April 25, 2012

Photographing the 2012 UHMC Fashion Tech Student Showcase


I recently had the opportunity again to photograph a fashion show by the UH Maui College Fashion Tech students at the Queen Kaahumanu Shopping Center.  I photographed their show last year as well and it's always fun to experiment with lighting as well as be inspired by seeing the amazing creations these talented students produce.


This year the title of the show was "Muse{ic}" - the students designed outfits based on their choice of music genre.


Lighting-wise, the location was very challenging. The existing stage lighting only covered the center portion of the stage. The sides as well as the runway were in the dark.


A total of 3 strobes were used to supplement the existing stage lighting.  2 Nikon SB26s were set up on Manfrotto 5001B lightstands behind the speakers on the sides of the stage (circled in red below).  The third strobe was a Canon 580EX II mounted to a flash bracket on the camera.


The two Nikon strobes were triggered by Pocket Wizard Plus IIs and were set to 1/64th power to add just a touch of edge lighting to the models when they reached the corners of the stage.  The two shots below illustrate the difference the edge lighting makes.


All three strobes were gelled with CTO gels and the camera was set to Tungsten white balance to match the existing stage lighting.

With this lighting setup, everything was shot in manual mode at iso 1600, 1/200 @ f2.8 to freeze the action and blur the background. The idea was to utilize as much of the stage lighting as possible while relying on the ETTL of the 580EXII on the camera to compensate when the models reached the dark corners of the stage and also when they walked down to the red carpet.


My camera rig consisted of a Canon 5D mkII and a WFT-E4 IIA Wireless Transmitter (transmitting images to an iPad carried in a belt pouch) with a 70-200mm f2.8L IS II lens, a ReallyRightStuff L bracket, and a 580EX II flash mounted on a RRS B87-QR Portrait Package Flash Bracket.  The flash was connected via an OC-E3 Off-Camera Shoe Cord to a Pocket Wizard MiniTT1 transmitter (to trigger the 2 Nikon SB26s) on the camera's hotshoe.  A CP-E4 External Battery Pack was connected to the flash to help with the recycle times.

The entire setup ended up being a bit heavy to handhold for the duration of the show.  Great for exercise, though. Thank goodness for image stabilization.

(see "Things to remember for next year" at the end of this post)


Because the models were constantly in motion, the autofocus mode was set to Ai Servo to track them as they crossed the stage.


Looking through the 2000+ images in Lightroom after the show, the lighting setup we used seemed to hold up ok. In hindsight, it might have been nice to setup two additional strobes to crosslight the red carpet area, but being in a crowded shopping center made that impractical.  Ideally we would have had enough stage lighting available to light all the areas evenly so that we would not have needed to use flashes at all, but you work with what you have.  If any readers out there have shot fashion shows before and want to share how you did your lighting, please feel free to do so in the comments.

I posted samples of each model and outfit on a photo gallery on our facebook page.

Also made a short highlight piece for our Youtube Channel:


Things to remember for next year:

Bring a monopod.  Handholding that camera rig for a 1.5 hour long fashion show nearly killed me.  I'm not that young anymore. ;-)

More Red Bull.

Get larger cards.  Shooting in RAW, I went through 4-16GB cards in no time at all.

When shooting the models walking, try to capture them in full stride which usually results in a better looking image (either when the front foot just touches the floor or when the rear foot is just about to leave the floor)

Remember to get shots from front, back, and both sides.  Designers need to see all of the details of the outfit as much as possible.

Sunday, April 15, 2012

Overpacking the Think Tank Photo Airport Security 2.0

When I shot with Irish and Kayo in Tokyo at the end of last year, I ended up taking a lot of gear with me.  Since I am never really sure what lighting equipment will be available at the rental studios we use, I prefer to have enough with me just in case. The lighting kit I carry along with my camera gear allows me lots of flexibility in creating different looks while keeping everything down to one bag.

I mainly use the Think Tank Airport Security v2.0 when I travel. Having owned several camera bags and rolling cases from other manufacturers before, I have found the Airport Security 2.0 to be the sturdiest, most well-built and well-designed rolling camera bag out of all of them. In one bag I am able to bring an entire studio lighting kit to location shoots.


The main points I like about this bag are:

It can hold a TON of gear


It has a built-in TSA lock for the main compartment.


(Sorry that this bag is not in the most presentable condition, but I use this bag A LOT.)

It is deep enough that a 70-200 2.8 lens can fit vertically which saves a lot of space. This one feature alone was one of the main reasons I bought this bag.


In the rear compartment is a cable and TSA lock to help deter your camera bag from "accidentally" walking away with someone else.


User replaceable wheels. The rolling case I had before did not have this feature and this is another major reason why I switched over to Think Tank.


Integrated backpack straps hidden in the back of the case that can be quickly deployed when you need to carry it on your back down a flight of stairs or over rough terrain.


Did I mention it can hold a TON of gear? In the Airport Security v2.0 I can fit ALL of the following:

Canon 5D mkII body with a WFT-E4 Wifi transmitter and a ReallyRightStuff L-bracket
4 - LP-E6 batteries (in cameras)
4 - Nikon SB26 Speedlights
40 - rechargeable AA batteries (in the flashes and battery packs)
4 - Pocket Wizard PC sync cords in an Altoids container.
 (The Altoids container also has strips of gaffer's tape on the lid - you never know when you'll need gaffer's tape.)
1 - RadioPopper PX transmitter
2 - RadioPopper PX receivers
2 - Gary Fong Lightspheres (1/2 Cloud) with 2 white domes and 1 amber dome
1 - Grid - homemade out of black cocktail straws, Frosted Flakes cereal box and lots of gaffer's tape
Manfrotto 190CX Tripod with ReallyRightStuff BH-40 ball head
Gerber Multitool
20ft USB to mini USB (tethering backup in case the wireless fails)
Ballpoint Pen
Sharpie ExtraFine Marker (with a few feet of extra gaffer's tape wrapped around it for good measure)
Lens Wipes
Shiseido Oil Absorbing Sheets  - soaks up oil on skin without messing up the makeup
Ball Bungies
Clothespins
Business Cards
Model Release Forms

The video below shows pretty much everything I took with me to Japan. A few things are missing in the video, like the iPad which I didn't have with me at the time that I shot this.

Also not shown is a Think Tank Photo Urban Disguise 60 that I also take to shoots. It slides right onto the extended handle of the Airport Security and holds a Macbook Pro, a couple of Justin Clamps, and any other miscellaneous items I might want to bring on a shoot.

And just to clarify, THIS IS NOT HOW I PACKED IT WHEN I TOOK IT ON THE AIRPLANE.  The Gerber Multitool, tripod, lightstands and softboxes all went into my check-in luggage for the trip.  Everything that was packed inside the Airport Security, (except the Gerber obviously) came with me as my carry-on.

Once I was IN Japan, THEN I packed everything into one bag like this for my photoshoots.


Our friends at Think Tank Photo just announced a special deal on their popular rolling camera bags.  Order their Airport Security V2.0, Airport International V2.0, Airport Airstream, or Airport TakeOff rolling camera bags before May 31, 2012 and you will receive one of their Artificial Intelligence V2.0 laptop sleeves for free!  

If you are looking to buy a roller before you head out this summer, this is a great time to do so!

Wednesday, April 11, 2012

Photography Workflow


My apologies for not posting in a while. A friend of mine recently asked me to share my photography workflow so that's what I've been working on.  Please keep in mind that I am by no means an expert in photographic workflows.  If you want to learn about really good workflows, Chase Jarvis has an excellent post about it.

Since I am on a much smaller scale, what I am describing here is not very elaborate.  Just a workflow that I have found that is simple and works for me.

Most of my editing is done on a dual quad-core Mac Pro.  I also use a 15" MacBook Pro when on location.

The software programs I mainly use are Adobe Lightroom 3 (soon to be 4), Adobe Photoshop CS5, and Carbon Copy Cloner.

There are 4 internal drives in the Mac Pro:

1. Main - an SSD drive that holds the OS and Application files
2. Work - all photo/video editing is done on this drive
3. Backup - used for backup copies of all current projects
4. Time Machine - uses the Time Machine feature of OSX to back up Main & Work drives

On my Work drive, I start with a template - which is simply a folder with a blank Lightroom catalog file in it.


To begin a new project, I duplicate the template folder and rename the copy with the job number using the following format: YEAR/MONTH/DAY/TYPEOFSHOOT/CLIENTNAME. The blank Lightroom catalog file within the folder is also renamed to the same format.


For example, I was recently part of a joint shoot with local artists Kahulani Davis and Ben Kikuyama. The model's name was Marissa and we shot on March 6, 2012, so the folder name and Lightroom catalog name would be labeled as: 20120306MS-Marissa


Some photographers like to use one main catalog in Lightroom that contains all their shoots.  I prefer to make a separate Lightroom catalog and folder for each particular job.  It's easier for me to keep track of shoots this way.


The RAW files from each card of the shoot are then copied into individual subfolders within this project folder. Each card gets it's own subfolder. I don't use any special software to do this, simply drag and drop on the desktop.


In Lightroom, the subfolders with the RAW files are dragged into the Library module so that I can see the thumbnails of each image before importing.


Images that don't need to be imported, such as lighting tests, shots where the flash didn't fire, etc. are deselected. After adding in the metadata of the shoot, copyright info, etc., a  Develop Preset is selected and the files are imported.


The Develop Preset applies the Lens Correction option and the Camera profile to each image.  The specific settings are based on a Lightroom Develop preset that I found which was originally created by photographer David Ziser.  You can learn more about this preset by going to his blog.

In the Develop module of Lightroom it is possible to apply the Lens Correction and Camera profiles to the images after they have been imported, but I have found that applying these via the Develop Preset during import saves a lot of time.


After importing, all the images are selected and renamed with the client name and a 3 or 4 digit sequence depending on how many shots were taken.

Once this is done, I exit out of Lightroom and backup the Project folder to the Backup Drive using a program called Carbon Copy Cloner. It's fast and verifies the transfer afterwards to insure file integrity.


This way I have the images in three locations - on the Work drive, Backup drive, and on the original cards.  Once the Compact Flash cards have been used on a shoot, they are not formatted again until just before the next shoot, and ONLY if they have already been backed up.

Once the folder has been backed up, I work only with the Lightroom catalog and Raw files that are on the Work Drive.

Back in Lightroom, I start going through the images using the 1-5 star rating in Lightroom to mark the ones to process (3 stars for "Like", 5 stars for "Really Like").


After the selects are marked, I set Lightroom to show me only the selected images.  These are then adjusted in Lightroom for basic exposure and color.


Retouching and major editing/compositing for each image is then done in Photoshop.


Once the editing is completed, the image is saved in Photoshop, which brings it back into Lightroom as a TIF file and appends "-Edit" to the end of the filename. This file appears next to the original Raw file in the Lightroom catalog, so that I can see the before and after.


When all the edits are done, I switch back to the Library module and select all the images that have "Edit" in the filename.


These are then exported out of Lightroom in 2 sizes - a hi resolution version for printing and a lower resolution version optimized for the web.  The web sized ones are then emailed to the client and the hi res versions are burned onto a CD for delivery.


One tip I recently learned is that when you are exporting a large amount of JPEGs, you can save time by doing multiple exports of smaller batches.  Since Lightroom is now 64-bit, it can handle multiple tasks at the same time.


Say for example you had to export 400 images.  Instead of selecting all of them and exporting them all at once, select 200 to export, and while those are exporting, select the other 200 and export them at the same time.  This might be even faster if you did 4 batches of 100, but it depends on the amount of CPU cores you have available in your machine.

For the final backup, I use Carbon Copy Cloner again to do an incremental backup.  This backs up just the edited TIFs and the updated Lightroom catalog to the Backup drive.  The RAW files remain untouched.

To archive the project, I also use Carbon Copy Cloner to copy the backup folder to a remote storage drive which is in a separate location from my work computer. A copy of the final images is also burned to a CD/DVD for filing as an additional backup.


Hope this gives you some ideas on how to setup your workflow.  The most important thing to remember is BACKUP YOUR IMAGES. A good rule of thumb is the 3x3x3 rule:

1. Make 3 separate copies of your images.
2. Use 3 different drives or types of media.
3. Store them in 3 separate locations.

If you have any questions or suggestions on how to improve this workflow (I'm ALWAYS looking for ways to improve my workflow) feel free to leave a comment on the blog or email me directly.


Wednesday, February 15, 2012

Tokyo studio shoot with Kayo

Canon 5D mkII 70-200mm f2.8L IS II lens iso 400 1/125 @ f5.6

This past December I was extremely fortunate to have the opportunity to work once again with one of my favorite models in Japan, Kayo Fantastic from Model Mayhem.

For this session we shot in the Force Studio in Edogawabashi.  This studio had a much darker theme compared to the previous studio we shot together in, which made it much easier to control the lighting. This worked out really well since we were going for a slightly edgier/sexier look for Kayo this time and I wanted to light her a little differently compared to our previous shoot together.

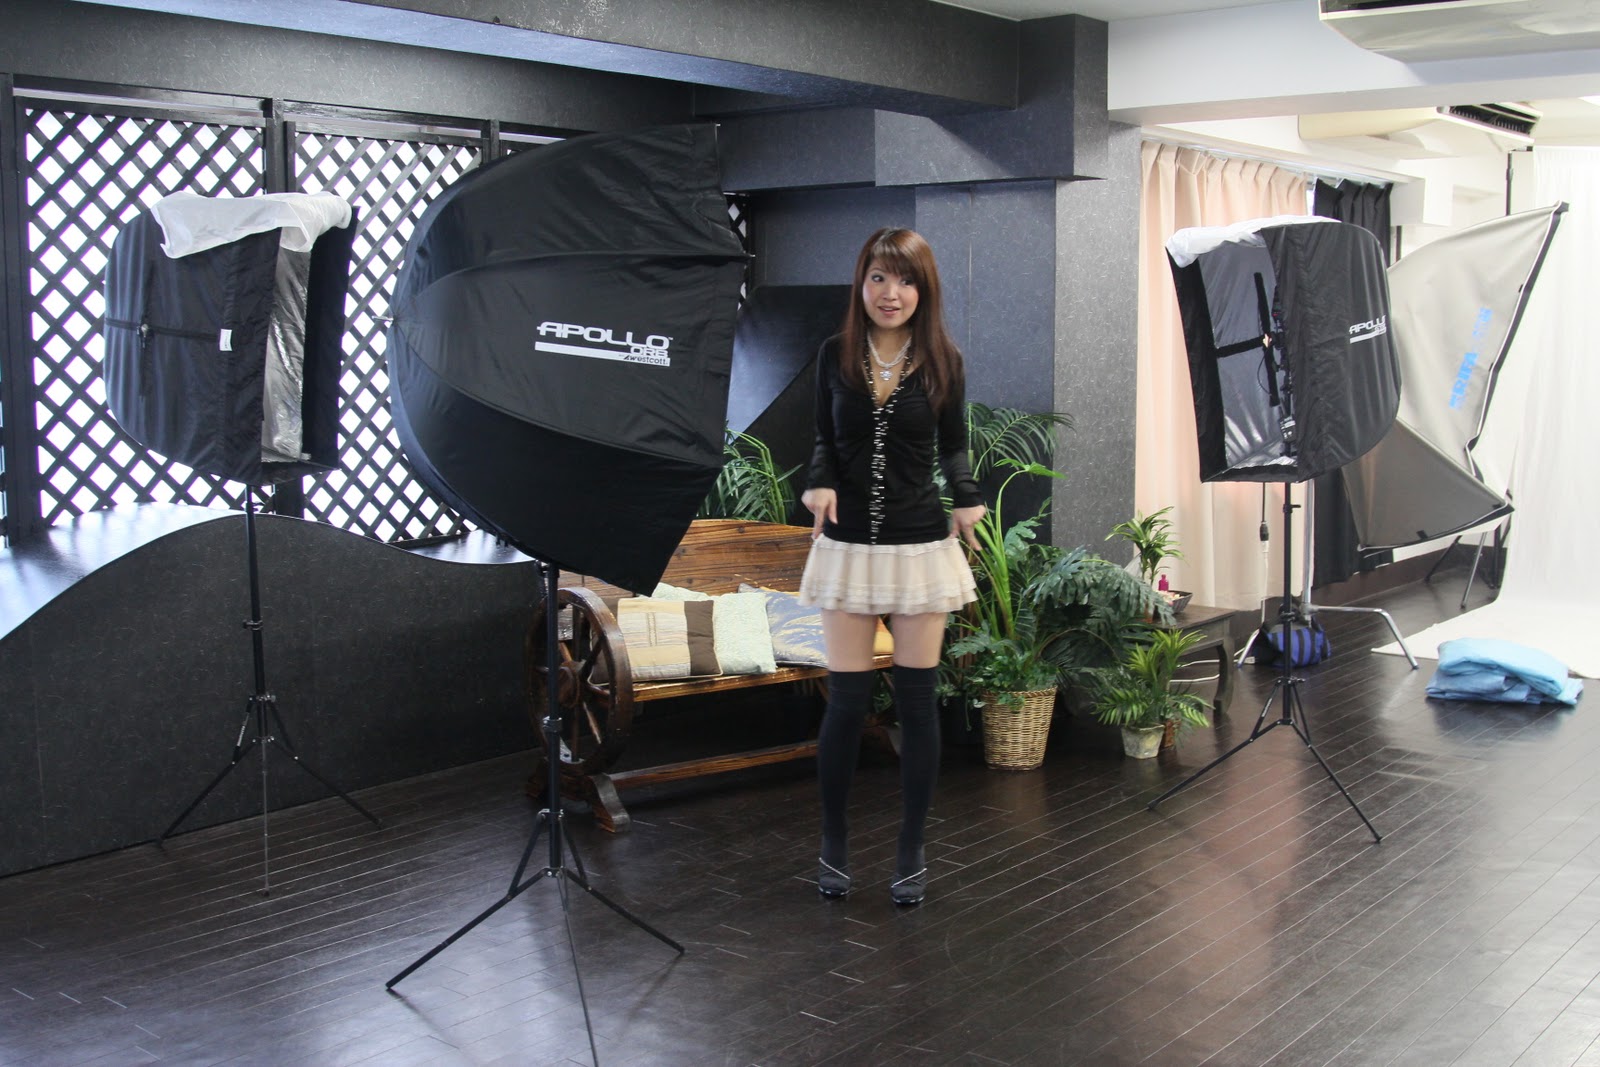
Our lighting for this session consisted mainly of 3 Nikon SB26 flashes triggered with Pocket Wizard Plus II tranceivers.  The light modifiers used were primarily the Westcott 43" Apollo Orb and two Westcott Apollo Strip Softboxes. We also used a Gary Fong Lightsphere and a  Lumiquest Softbox III for a few setups.


There were several potted plants near a bench in the middle of the studio and to keep things simple we used this as our first set.

An SB26 with a CTO gel and a Stofen Omnibounce was used behind the plants for a background light.


The Westcott Apollo Orb was used as the main light and the two Strip lights were used on either side of Kayo  to help separate her from the background.


Canon 5D mkII 70-200mm f2.8L IS II lens iso 400 1/160 @ f5.6

Canon 5D mkII 70-200mm f2.8L IS II lens iso 400 1/125 @ f5.6

Next we went into some headshots against a wall on the other side of the studio. Used the Westcott Orb as Kayo's main light, overpowering the existing window light.


An SB26 with a CTO gel and a grid was used to light the wall behind her.  Another SB26 was aimed at the back of her hair for a rim light.


Had a Vornado fan nearby to add movement to her hair.

Canon 5D mkII 70-200mm f2.8L IS II lens iso 400 1/160 @ f5.6

Canon 5D mkII 70-200mm f2.8L IS II lens iso 400 1/160 @ f5.6

Canon 5D mkII 70-200mm f2.8L IS II lens iso 400 1/160 @ f5.6

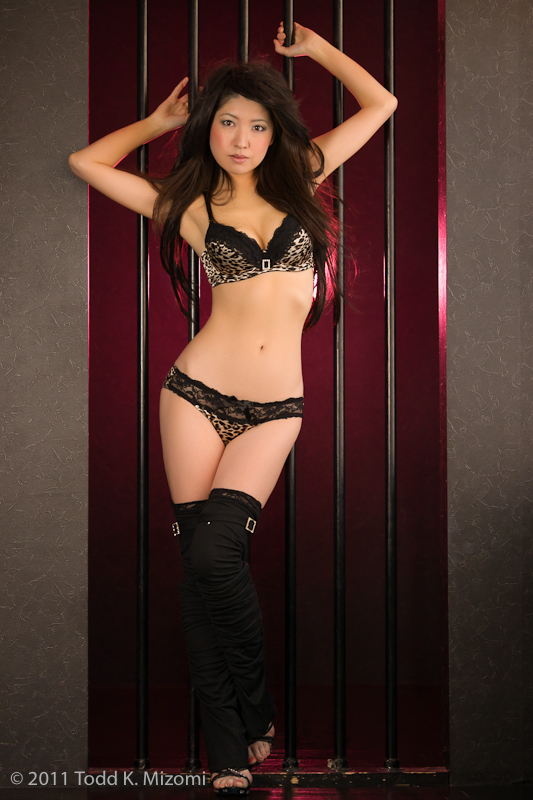
In one corner of the studio we found a set of prison bars.  This looked like it would be fun to work with but the space behind the bars was completely black. In order to give the shot some depth I knew we would need to light it somehow.


In the small corner behind the bars, we used a Nikon SB26 with a red gel and a Gary Fong lightsphere.  This lit both the background and rim lit the model in red.

Once Kayo had changed outfits, she found this great hairpiece to use which gave her a totally different look. We used one of the striplights for her main light, but positioned low in front of the bars and aimed up at her face to add a little more drama to the shot.

Canon 5D mkII 70-200mm f2.8L IS II lens iso 400 1/160 @ f4

After taking a couple of shots behind the bars, we then brought Kayo around to the front. There was a large window next to the bars which you can see in the photo below, and we did some natural light shots while still using the rear lights for background and rim light.


Canon 5D mkII 70-200mm f2.8L IS II lens iso 1600 1/125 @ f4 

Canon 5D mkII 70-200mm f2.8L IS II lens iso 1600 1/125 @ f4 

Since Kayo was now in front of the bars, the window light wrapped around her more, which greatly reduced the effect of her rim light.

Canon 5D mkII 70-200mm f2.8L IS II lens iso 1600 1/125 @ f4 

Canon 5D mkII 70-200mm f2.8L IS II lens iso 1600 1/125 @ f4 

To change up the lighting and go back to more of a glamour look, I added another SB26 to the lightstand behind the bars and aimed it towards Kayo.  I also swapped out the gel on the background light for one that was a little more red.


For her main light, we used another SB26 with a Lumiquest III Softbox.


Canon 5D mkII 70-200mm f2.8L IS II lens iso 400 1/125 @ f5.6

Canon 5D mkII 70-200mm f2.8L IS II lens iso 400 1/125 @ f5.6

While Kayo changed into her next look, I thought it would be nice to do a few more shots with the windows on this side of the studio since they had an interesting kind of high techy pattern on them.


A bare SB26 was set in the corner to act as a hair light.


Canon 5D mkII 70-200mm f2.8L IS II lens iso 800 1/160 @ f2.8 

We did a few shots with the window light as her main light, then switched to using the SB26 with a Lumiquest Softbox III.


Canon 5D mkII 70-200mm f2.8L IS II lens iso 800 1/160 @ f5.6

Canon 5D mkII 70-200mm f2.8L IS II lens iso 800 1/160 @ f5.6

Our final setup resulted in one of my favorite shots of the day and it worked out way better than I had originally planned.

This was a shot where we tried a combination of a fan and a length of red organza fabric wrapped around Kayo.  To be honest, I didn't really have a solid image in mind when we started working on this set (that's something I need to work on - getting a clearer idea of what I want to shoot BEFORE the shoot).  I only knew that I wanted to show fabric in motion, some mystery, and some sexiness without being too revealing.  I really have to thank Kayo for this one because she was extremely patient with me while I set everything up for this shot.

Although I had brought a small Vornado fan for the shoot, it wasn't really strong enough to keep the fabric flying upward out of the frame like I had originally planned. We had to figure out a way to suspend the fabric above Kayo.  Ideally in a situation like this we would use a stand with a boom arm or an assistant. Since we did not have a boom arm available (there's only so much lighting gear that I can bring when I travel), a bit of MacGyvering was needed.

Our solution was to use 2 ball bungies to strap a small light stand to the back of a chair to create an impromptu arm to which we could then clip the red fabric to:


Had to put some extra gear onto the chair itself to weigh it down so that it would not topple over onto Kayo.  Always think of your model's safety when suspending objects above him/her.

To light this we used two Westcott Apollo Strip Softboxes positioned on either side of Kayo.  In the setup shot, you can see all that stuff in the background.  By bringing in the lights very close to the model and setting the power levels to 1/2 power (or maybe it was full power?), we were able to overpower the existing light in the studio and hide all of that in darkness.


So now that we had that setup, I positioned the fan so that it would add a little motion to the part of the fabric that was suspended.  If we had been lucky enough to have had an assistant, we could have had them to point the fan at the fabric and move the fan from side to side until we got just the right look.  Since it was just Kayo and myself that day, I would take a couple shots, adjust the fan position, shoot a couple more frames, move the fan again, etc.

Like I've said before, assistants are invaluable on a shoot. :-)

Canon 5D mkII 70-200mm f2.8L IS II lens iso 100 1/160 @ f3.5

I also had Kayo shift her position slightly between shots so that we would get subtle differences in the feathering of the light across her form.

This shot was one of those where everything came together just right - the fan caught the fabric and made it ripple and Kayo's hand pose created some shadows that added a sense of mystery to the image that I really liked.

Canon 5D mkII 70-200mm f2.8L IS II lens iso 100 1/160 @ f4

It was so much fun to work with Kayo again, I just wish that we had more than just 3 short hours to work together this time as there was so much more we could have done together.  Will just have to save the ideas until next time.